OKD 4.3 is NOT recommended.
Please use the OKD 4.4 version of this guide located here:
Let’s face it, the cloud is too expensive for OpenShift enthusiasts to set up a test OpenShift environment. Used hardware for a home lab that could run an OCP cluster among other things is relatively inexpensive these days, $250–$350, especially when compared to a cloud-hosted solution costing over $250 per month. The way many of us learn is through experience and with using home labs we can learn new technologies by installing, breaking, and fixing them ourselves.
Before deploying several OpenShift 3.11 clusters in a production environment, I perfected my playbooks and deployments in a home lab using the upstream version, OKD (previously known as origin). The amount of knowledge I gained by building, tearing down, and rebuilding the cluster several times has been valuable and has since been used that experience to solve production issues. When I found out in October of 2018 that OpenShift 4 was built following an immutable infrastructure principal and that when combined with CoreOS OpenShift offered OTA like updates, I was all in.
It has taken some time, but I have succeeded in building an OpenShift 4.x OKD cluster in my home lab. It can be difficult and overwhelming to design an architecture in your home lab specifically for ODK. Fortunately, I was able to come up with a design that worked and I would like to share the process with others.
Note: At the time of writing OKD is in preview and is still a work in progress so expect bugs and workarounds.

This guide assumes you have a VMWare host, Linux terminal (Ubuntu Terminal, putty, or similar for Windows users), basic knowledge of Linux, the ability to Google, and a separate network that is not 192.168.1.0/24.
Note: If you are already using a 192.168.1.0/24 network, be sure to use a different IP scheme for your OKD environment.
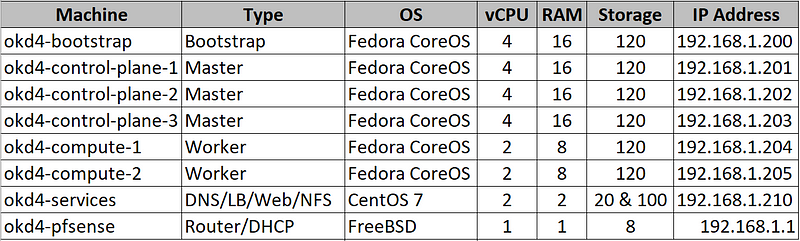
VM Overview:
For my installation, I used an ESXi 6.5 host with a separate VLAN configured for OKD. My host has 96GB of RAM with only 67GB being used for OKD. Here is breakdown of the virtual machines:
Note: “There are terraform scripts available to setup vSphere-enabled kubelet” -/r/roignac. I chose not to use the scripts as it added an extra layer of complexity, but they are available.
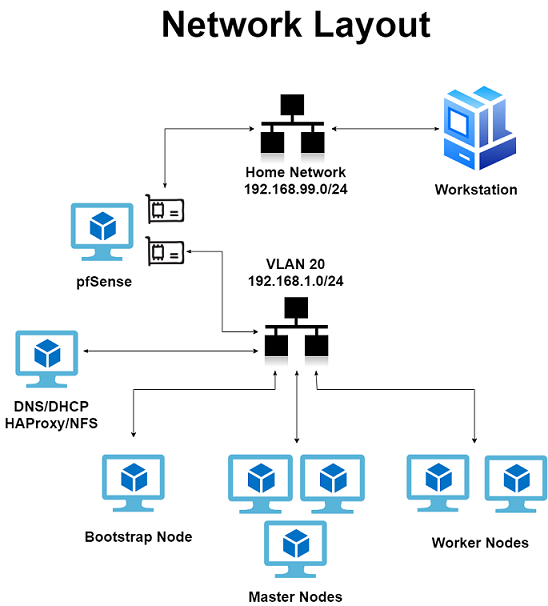
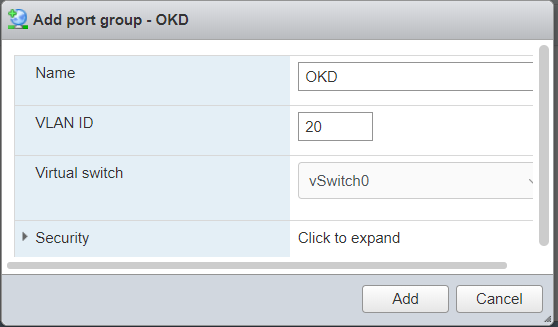
Create a new network in VMWare for OKD:
Login to your VMWare Host. Select Networking → Port Groups → Add port group. Setup an OKD network on an unused VLAN, in my instance VLAN 20.

Create a pfSense VM:
Download the pfSense ISO and upload it to your ESXi host’s datastore.

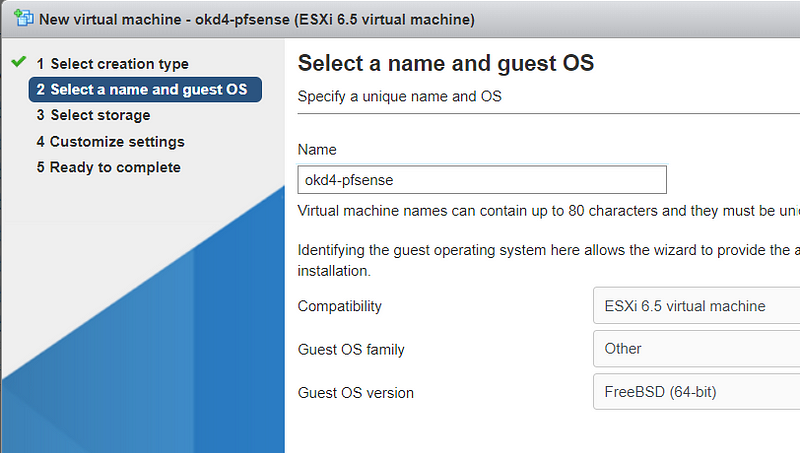
Create a new Virtual Machine. Choose Guest OS as Other and Select FreeBSD 64-bit.
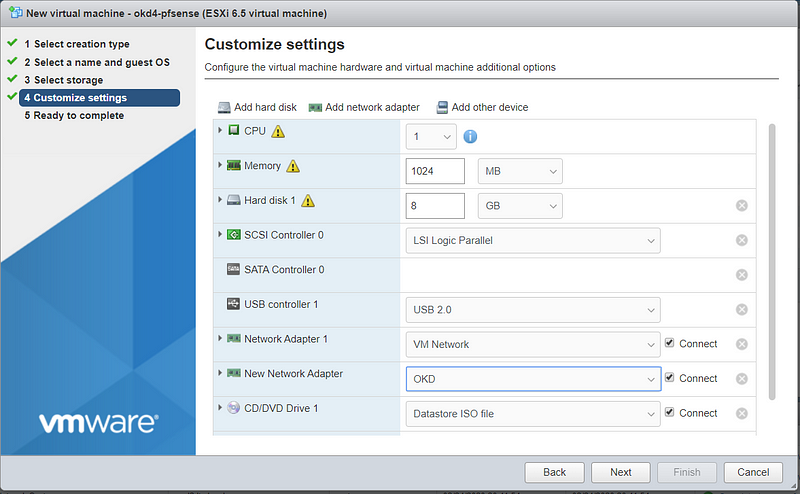
Use the default template settings for resources. I prefer to thin provision my disks for non-production use.
Select your home network for Network Adapter 1, and add a new network adapter using the OKD network.
Setup pfSense:
Power on your pfSense VM and run through the installation using all the default values. After completion your VM console should look like this:
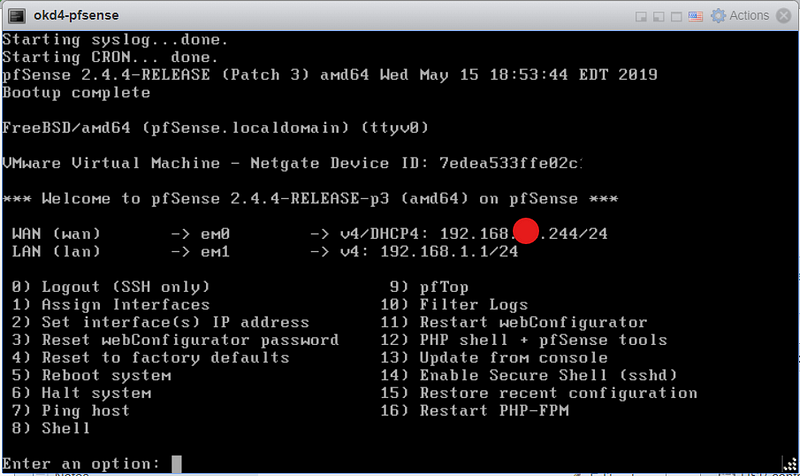
Using the VMWare console on the pfSense VM, select option 8 to access the shell. Type “pfctl –d” to turn off the packet filter temporarily. Next, add a firewall rule by typing “ easyrule pass wan tcp any any 443”. This will allow you to access the pfSense web GUI from your workstation.
Source: https://docs.j7k6.org/pfsense-wan-webinterface/
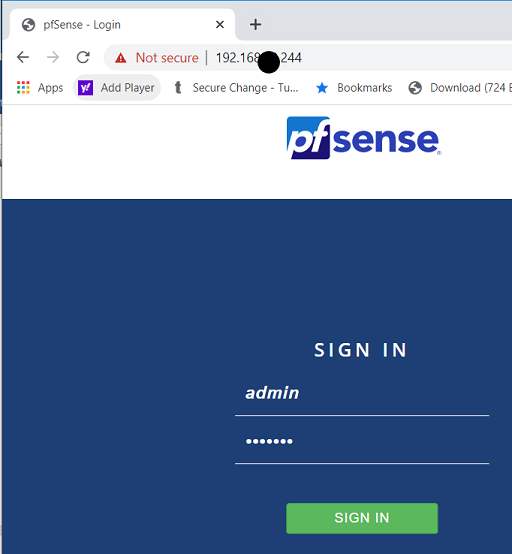
Login to pfSense via your web-browser. The default username is “admin” and the password is “pfsense”.
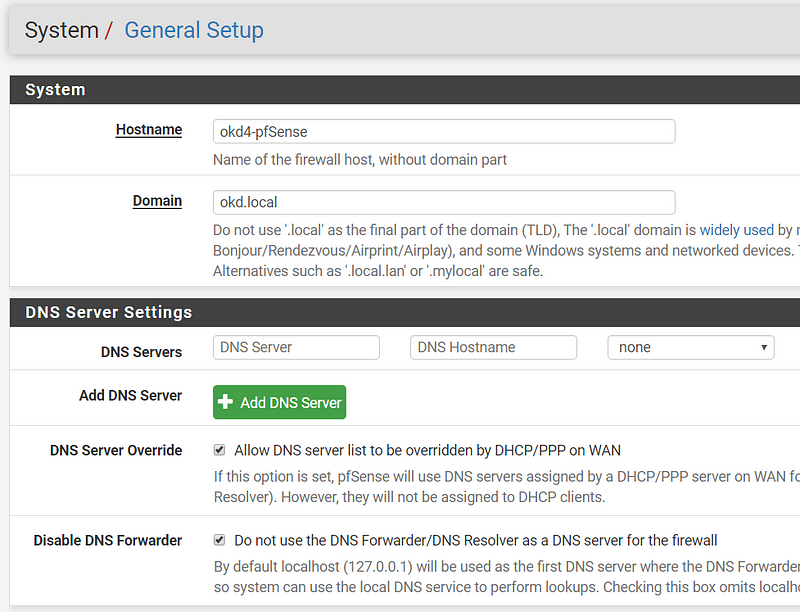
After logging in, click next and use “okd4-pfsense” for hostname and “okd.local” for the domain. Also, enable DNS Server Override and Disable DNS Forwarder. Next.
Select your Timezone. Next.
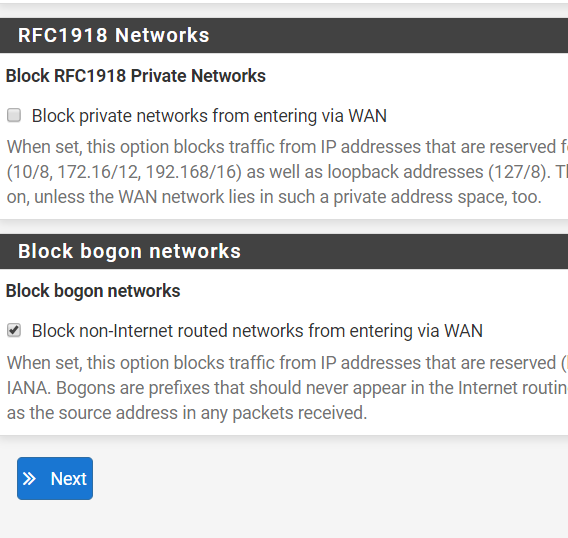
Use Defaults for WAN Configuration. Uncheck “Block RFC1918 Private Networks” since your home network will be the “WAN” in this setup. Next.
Create bootstrap, master, and worker nodes:
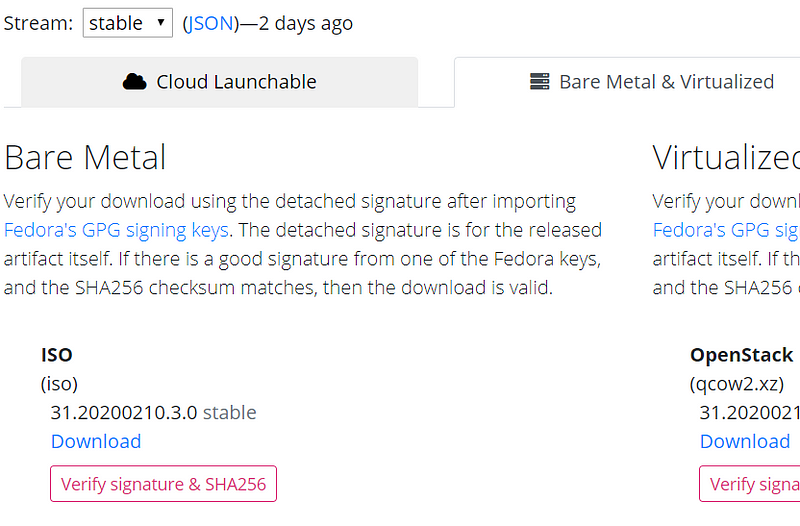
Download the Fedora CoreOS Bare Metal ISO and upload it to your ESXi datastore.
The latest stable version at the time of writing is 31.20200210.3.0
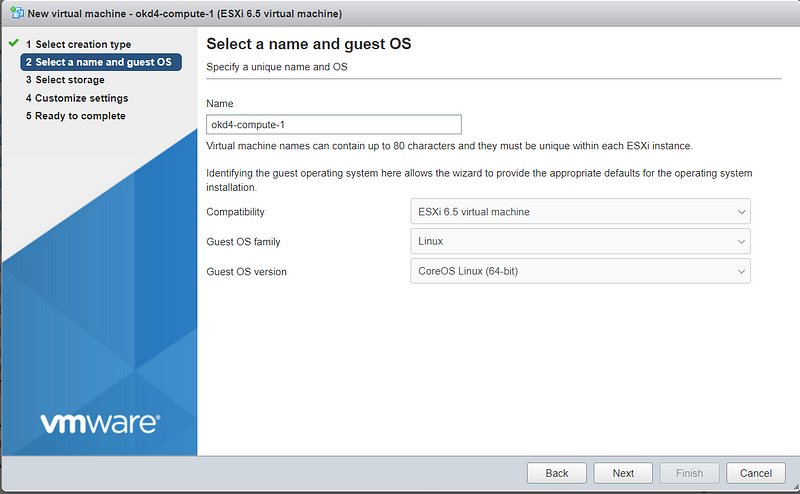
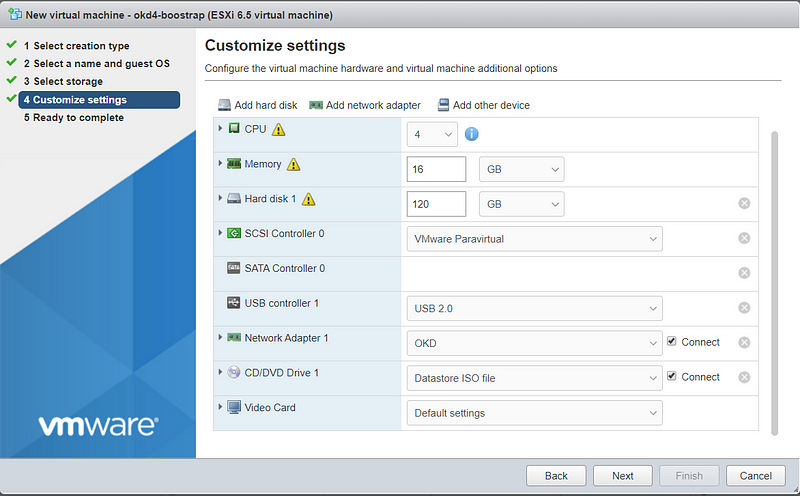
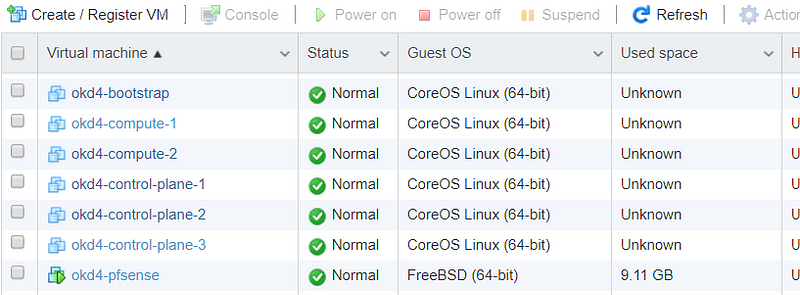
Create the six ODK nodes (bootstrap, master, worker) on your ESXi host using the values in the spreadsheet:
You should end up with the following VMs:
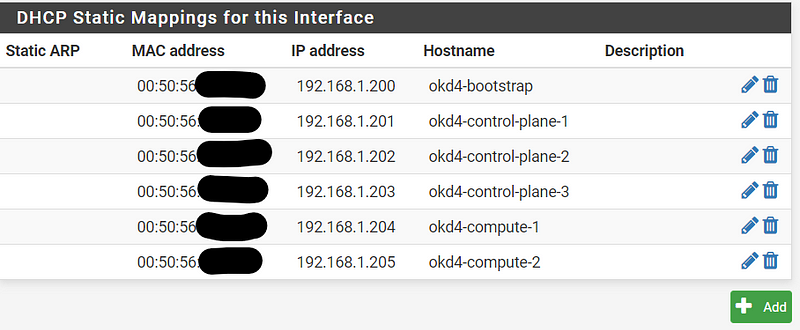
Setup DHCP reservations:
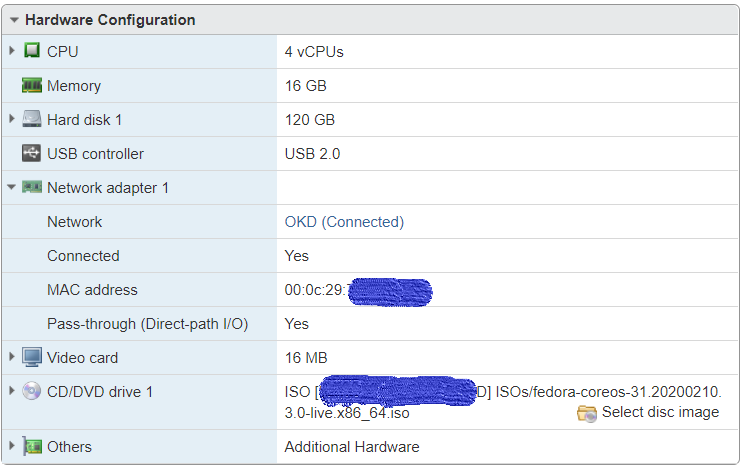
Compile a list of the OKD nodes MAC addresses by viewing the hardware configuration of your VMs.
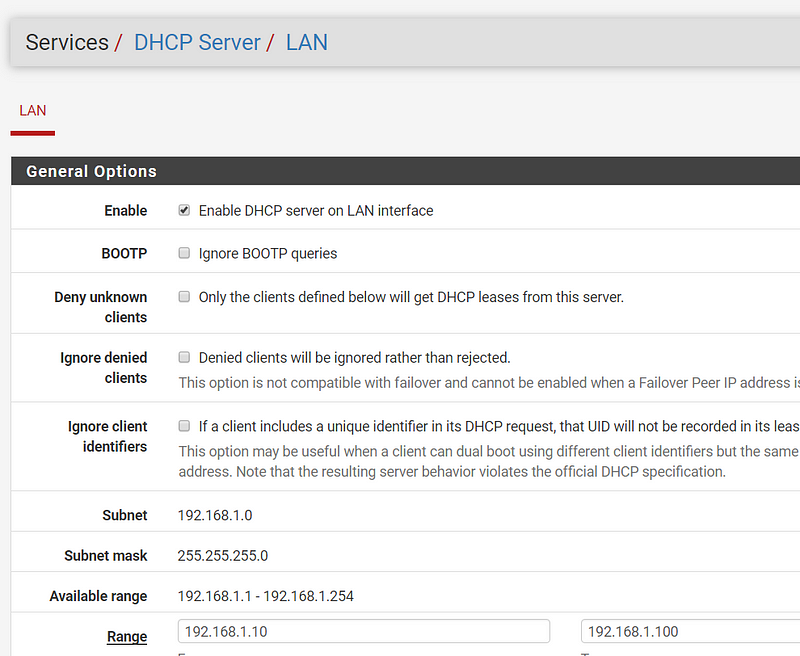
Login into pfSense. Go to Services → DHCP Server and change your ending range IP to 192.168.1.99, then click Save.
On the DHCP Server, page click Add at the bottom.

Fill in the MAC Address, IP Address, and Hostname, then click save. Do this for each ODK VM. Click Apply Changes at the top of the page when complete.
Create and set up VM to host various services:
The okd4-services VM is used to provide DNS, NFS exports, web server, and load balancing.
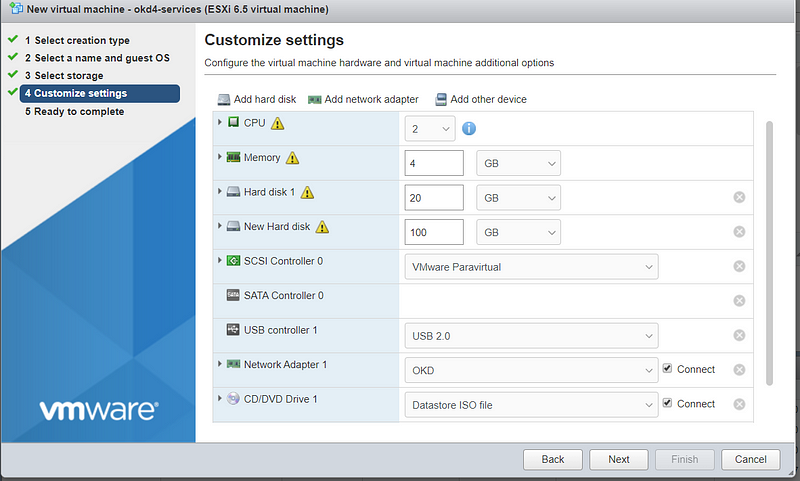
Download CentOS 7 minimal ISO (no GUI) and upload it to your ESXi datastore. Example: CentOS-7-x86_64-Minimal-1908.iso
Create your okd4-services virtual machine. The 20GB drive is for the OS. The 100GB drive is for NFS and will be persistent storage for the OpenShift registry. #ThinProvision
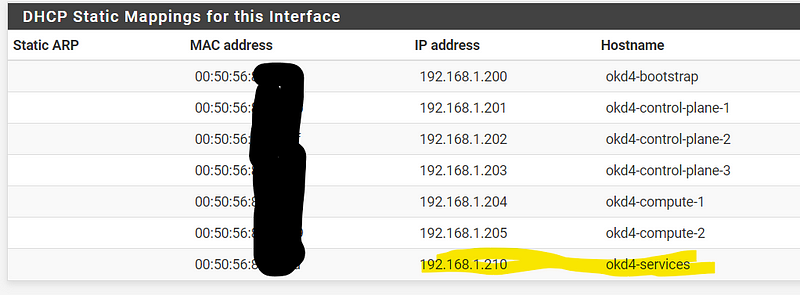
After creating the VM copy the MAC address on the VM Hardware configuration page and set up a DHCP Reservation for this VM using the IP address 192.168.1.210. Hit “Apply Changes” at the top of the DHCP page after you are done.
Power on the okd4-services VM.
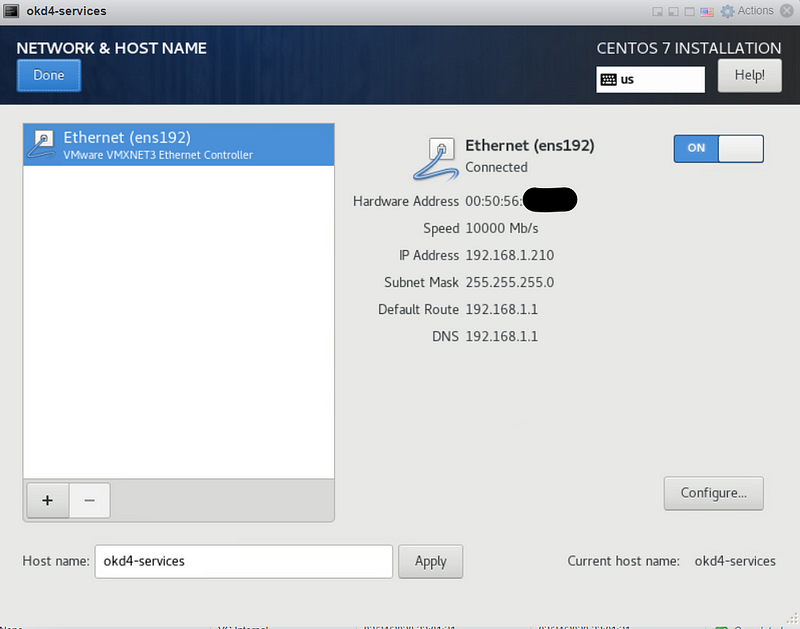
Run through a typical CentOS 7 install, use the 20GB drive to install the OS on. On the networking page, it should pull the 192.168.1.210 IP address from DHCP. Set a root password and an admin user.
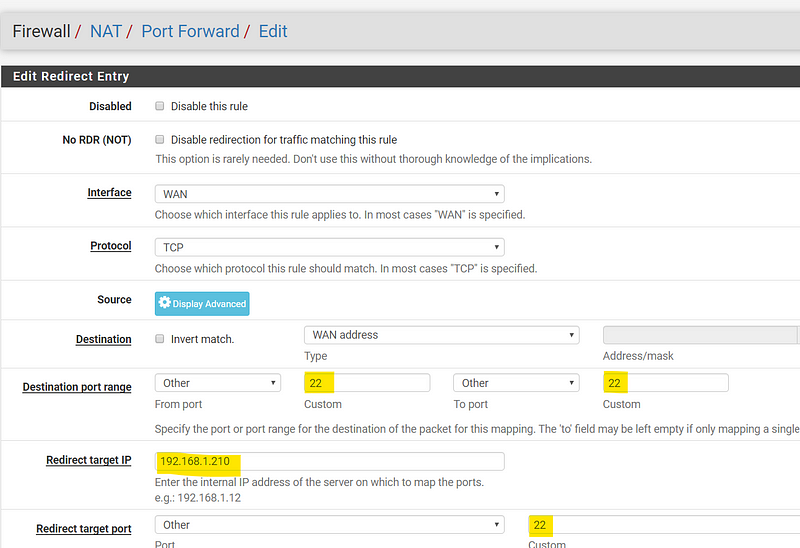
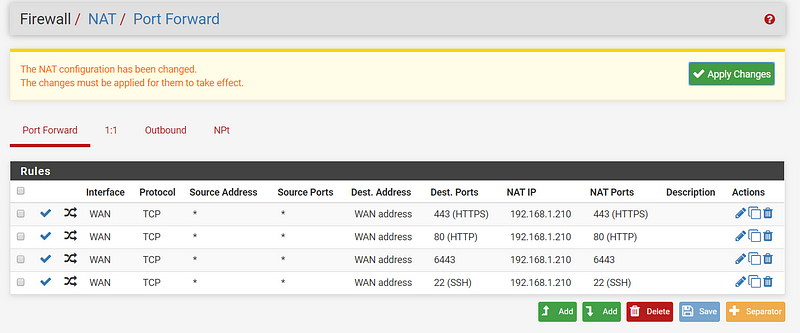
While CentOS is installing, go to the pfSense GUI and setup a port forward to the okd4-services for remote ssh/scp access. This will allow you to ssh from your workstation to easily copy and paste bash commands. Go to Firewall → NAT → Port Forward → Add
Destination port range “22” to “22”; redirect target IP “192.168.1.210”; redirect target port “22”
Click Save, then Apply Changes.
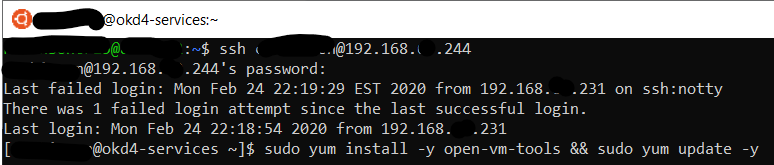
Reboot the okd4-services VM after installation and ssh to the WAN IP of your pfSense VM that you port forwarded to the okd4-services server.
ssh user@pfsense_ip
Install open-vm-tools, vim, wget, and git packages. Also yum update the OS, and reboot after completion.
sudo yum install –y open-vm-tools vim wget git && sudo yum update –y && sudo init 6
After updated and a restart. Use git to download the DNS, HAProxy, and install-conf.yaml example files via git:
git clone https://github.com/cragr/okd4_files.git
cd okd4_files
Install bind (DNS)
sudo yum -y install bind bind-utils
Copy the named config files and zones:
sudo cp named.conf /etc/named.conf
sudo cp named.conf.local /etc/named/
sudo mkdir /etc/named/zones
sudo cp db* /etc/named/zones
Enable and start named:
sudo systemctl enable named
sudo systemctl start named
sudo systemctl status named
Create firewall rules:
sudo firewall-cmd --permanent --add-port=53/udp
sudo firewall-cmd --reload
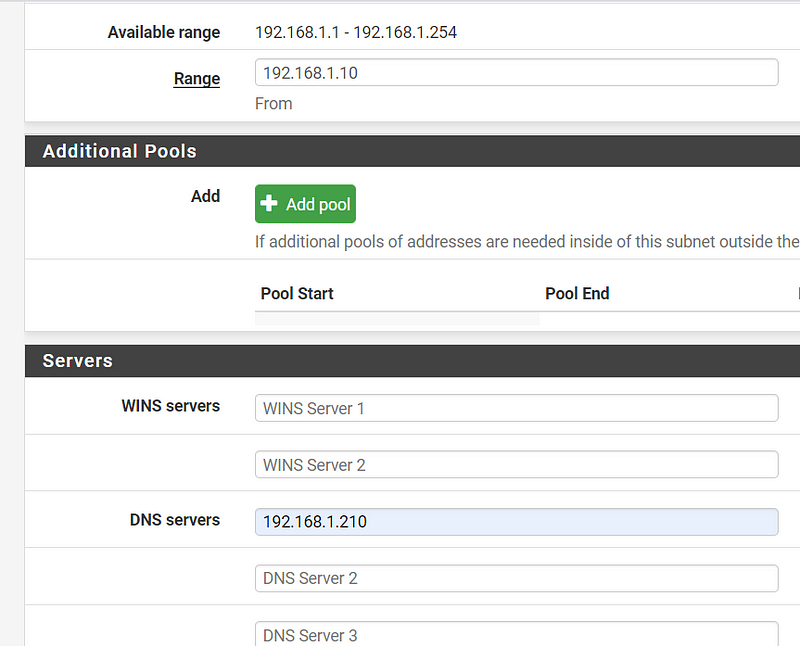
Set the DNS server IP to 192.168.1.210 in the pfSense DHCP server settings. Services → DHCP → Servers
Restart the network services on the okd4-services VM:
sudo systemctl restart network.service
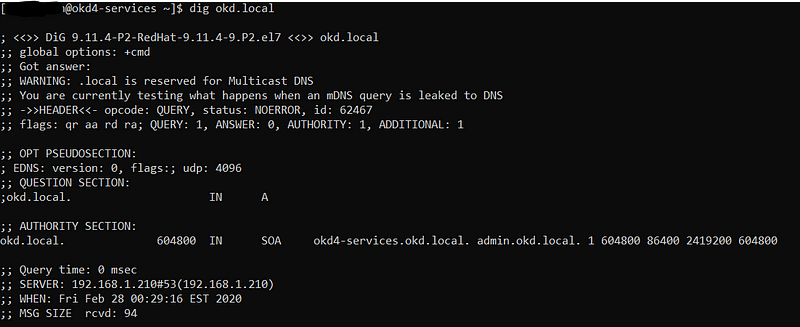
Test DNS on the okd4-services
dig okd.local
dig –x 192.168.1.210
Install HAProxy:
sudo yum install haproxy
Copy haproxy config from the git okd4_files directory :
sudo cp haproxy.cfg /etc/haproxy/haproxy.cfg
Start, enable, and verify HA Proxy service:
sudo systemctl enable haproxy
sudo systemctl start haproxy
sudo systemctl status haproxy
Add OKD firewall ports:
sudo firewall-cmd --permanent --add-port=6443/tcp
sudo firewall-cmd --permanent --add-port=22623/tcp
sudo firewall-cmd --permanent --add-service=http
sudo firewall-cmd --permanent --add-service=https
sudo firewall-cmd --reload
Install Apache/HTTPD
sudo yum install –y httpd
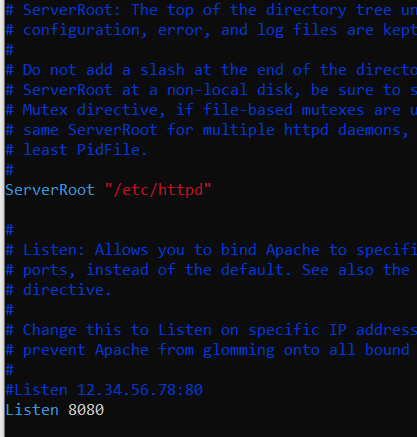
Change httpd to listen port to 8080:
sudo vim /etc/httpd/conf/httpd.conf
Change “Listen 80” to “Listen 8080” around line 42:
Enable and Start httpd service/Allow port 8080 on the firewall:
sudo systemctl enable httpd
sudo systemctl start httpd
sudo firewall-cmd --permanent --add-port=8080/tcp
sudo firewall-cmd –reload
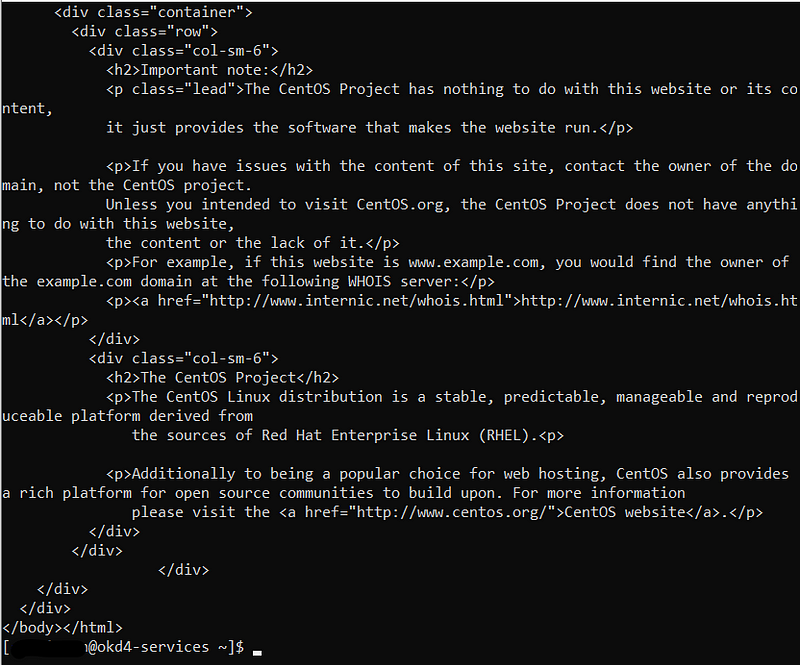
Test the webserver:
curl localhost:8080
pfSense Tweaks
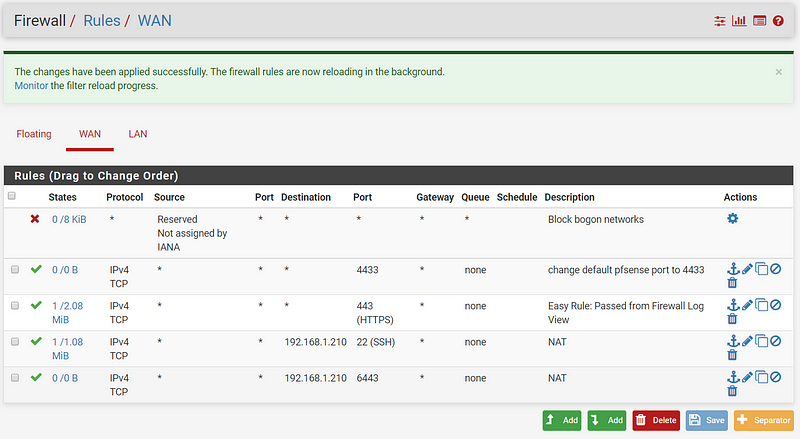
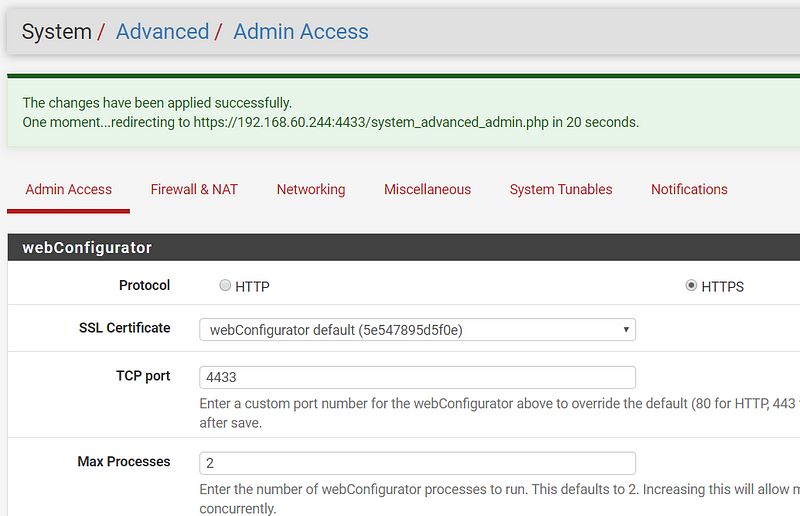
To access OKD on port 443 from your home network we need to change the management port on the pfSense like so:
Add 4433 to Firewall rule on PFSense; Firewall → Rules → WAN → Add
Change PFSense default port to 4433; System → Advanced → TCP Port Change to 4433
Add 6443, 80, 443 port-forward rules to okd4-services for access from your home network.
Congratulations You Are Half Way There!
Congrats! You should now have a separate home lab environment setup and ready for ODK. Now we can start the install.
Download the openshift-installer and oc client:
SSH to the okd4-services VM
To download the latest oc client and openshift-install binaries, you need to use an existing version of the oc client.
Download the oc client from the OKD releases page. Example:
wget https://github.com/openshift/okd/releases/download/4.3.0-0.okd-2019-11-15-182656/openshift-client-linux-4.3.0-0.okd-2019-11-15-182656.tar.gz
Extract the okd version of the oc client:
tar -zxvf openshift-client-linux-4.3.0-0.okd-2019-11-15-182656.tar.gz
Move the kubectl and oc to /usr/local/bin and show the version:
sudo mv kubectl oc /usr/local/bin/
oc version
The latest releases are listed on https://origin-release.svc.ci.openshift.org/.
The version I installed was 4.3, specifically 4.3.0–0.okd-2020–02–29–000821
oc adm release extract --tools registry.svc.ci.openshift.org/origin/release:4.3
This downloads two tar.gz files, one containing a new version of the oc client and the openshift-install binary.
Extract and move the new version of the oc client, openshift-installer and kubectl. Verify the version:
tar -zxvf openshift-client-linux-4.3.0-0.okd-2020-02-29-000821.tar.gz
tar -zxvf openshift-install-linux-4.3.0-0.okd-2020-02-29-000821.tar.gz
sudo mv oc kubectl openshift-install /usr/local/bin/
oc version
Setup the openshift-installer:
In the install-config.yaml you can either use a pull-secret from RedHat or apply a bypass fix. I recommend getting a pull-secret from RedHat for two reasons; The pull-secret from RedHat will allow you to access samples and operators on registry.redhat.io and at the moment it is difficult to change after the cluster is built. For the bypass use “{“auths”:{“fake”:{“auth”: “bar”}}}” as the pull-secret.
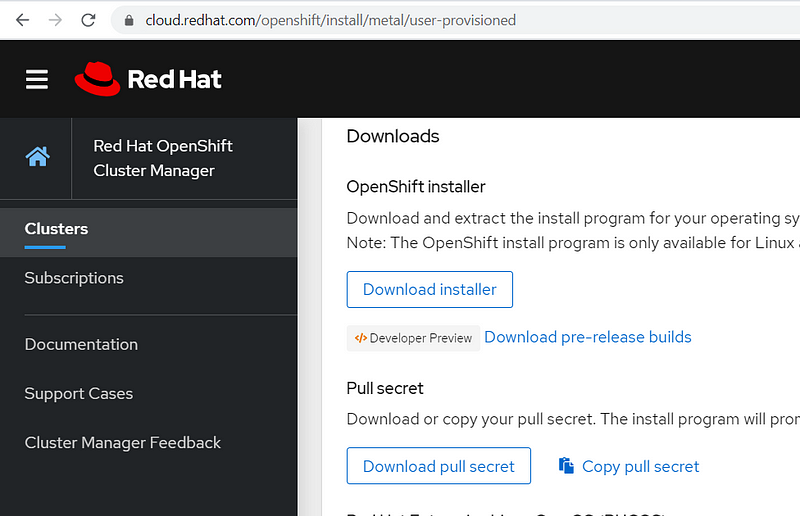
Optional: Go to https://try.openshift.com/ and get a pull secret from RedHat. If you do not have an account I recommend creating a no-cost developer account.
Create an install directory and copy the install-config.yaml file:
cd ~
mkdir install_dir
cp okd_files/install-config.yaml ./install_dir
Edit the install-config.yaml in the install_dir, insert your pull secret and ssh key, and backup the install-config.yaml as it will be deleted in the next step:
sudo vim ./install_dir/install-config.yaml
cp ./install_dir/install-config.yaml ./install_dir/install-config.yaml.bak
Generate the Kubernetes manifests for the cluster, ignore the warning:
openshift-install create manifests --dir=install_dir/
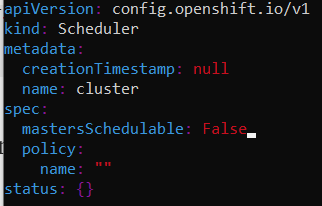
Modify the cluster-scheduler-02-config.yaml manifest file to prevent Pods from being scheduled on the control plane machines:
vim install_dir/manifests/cluster-scheduler-02-config.yml
Locate the mastersSchedulable parameter and change the value to False:
Now you can create the ignition-configs:
openshift-install create ignition-configs — dir=install_dir/
Note: If you reuse the install_dir make sure it is empty. Hidden files are created after generating the configs and they need to be removed if you use the same folder on a 2nd attempt.
Host ignition and Fedora CoreOS files on the webserver:
Create okd4 directory in /var/www/html:
sudo mkdir /var/www/html/okd4
Copy the install_dir contents to /var/www/html/okd4:
sudo cp -R install_dir/* /var/www/html/okd4/
Test the webserver:
curl localhost:8080/okd4/metadata.json
Download the Fedora CoreOS bare-metal bios image and sig files and shorten the file names:
cd /var/www/html/okd4/
sudo wget https://builds.coreos.fedoraproject.org/prod/streams/stable/builds/31.20200210.3.0/x86_64/fedora-coreos-31.20200210.3.0-metal.x86_64.raw.xz
sudo wget https://builds.coreos.fedoraproject.org/prod/streams/stable/builds/31.20200210.3.0/x86_64/fedora-coreos-31.20200210.3.0-metal.x86_64.raw.xz.sig
sudo mv fedora-coreos-31.20200210.3.0-metal.x86_64.raw.xz fcos.raw.xz
sudo mv fedora-coreos-31.20200210.3.0-metal.x86_64.raw.xz.sig fcos.raw.xz.sig
Begin the Install:
This section is where I spent a lot of time repeating the steps in order to get the installation set up correctly. I had to generate the ignition configs on several different occasions due to typos. If you do regenerate those ignition configs be sure to remove all the files (including hidden ones) in the install dir:
sudo rm -rf install_dir/*
If you are concerned you may have a bad install and want to start with a clean install, you can.
To start a clean install, edit the VM and delete the HD on the nodes that have gone through the install process and click save to remove the drive. Next, edit the VM again and add a new drive and click save. Once the drive has been removed and re-added, start back from this point of powering on the bootstrap and try again.
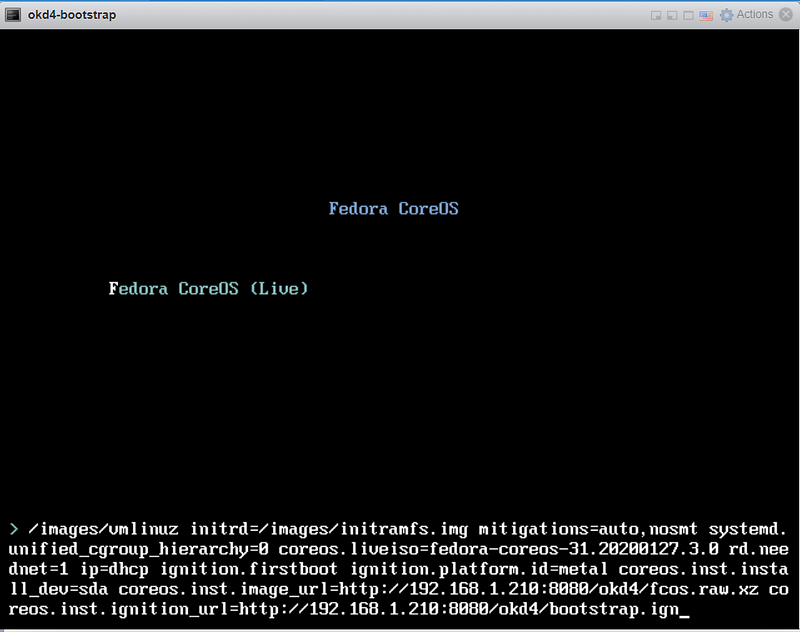
Staring the bootstrap node:
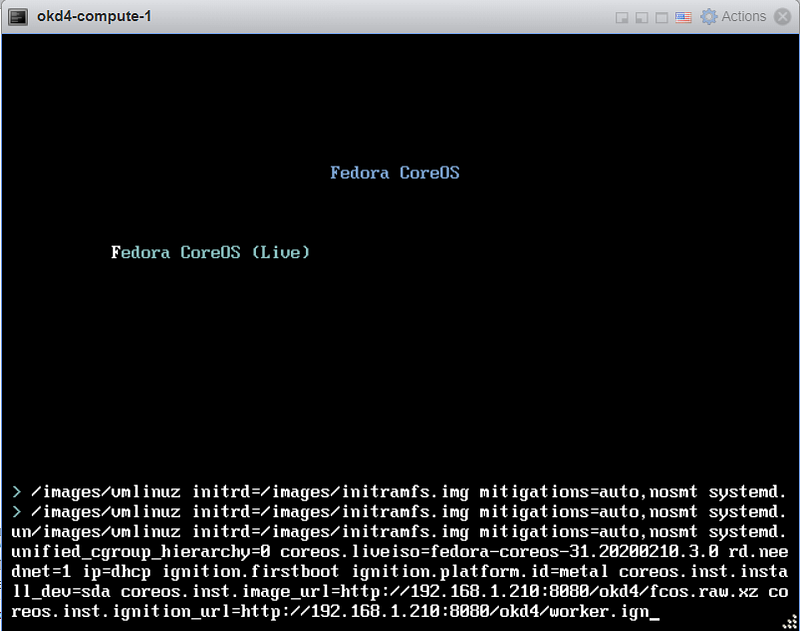
Power on just odk4-bootstrap VM for starters. Press the TAB key to edit the kernel boot options and add the following:
coreos.inst.install_dev=sda
coreos.inst.image_url=http://192.168.1.210:8080/okd4/fcos.raw.xz
coreos.inst.ignition_url=http://192.168.1.210:8080/okd4/bootstrap.ign
You should see that the fcos.raw.gz image and signature have been downloaded:
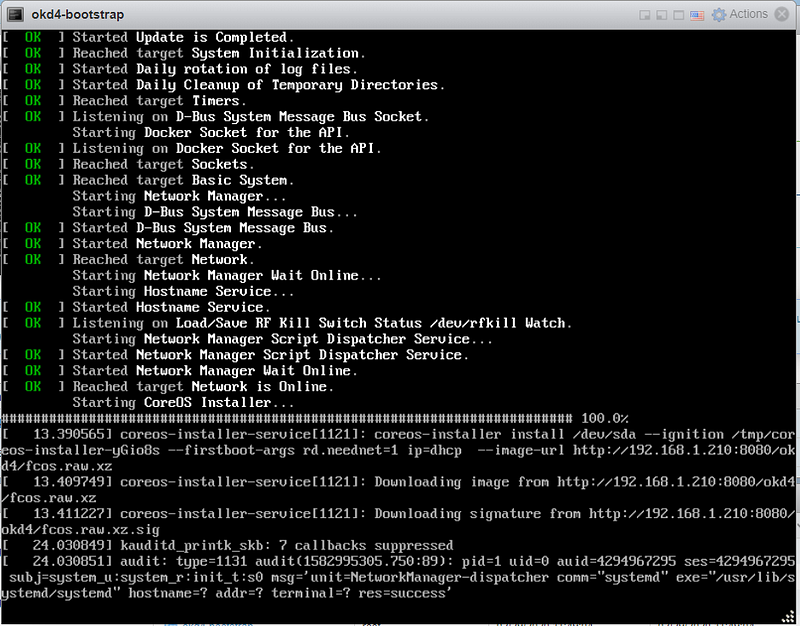
After the image is installed, the VM will restart to the login screen and begin to show the following (do not panic, this is normal):
The console window will show a lot of messages during the install. At this point, I recommend connecting to the bootstrap node via SSH and watching the bootkube service logs. You can ssh from your okd4-servers node by using the following command:
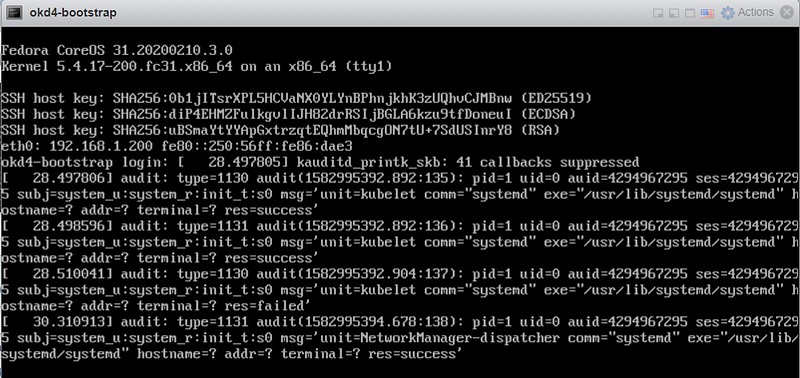
ssh -i ~/.ssh/rsa_id [email protected]
Upon login you will see this screen:
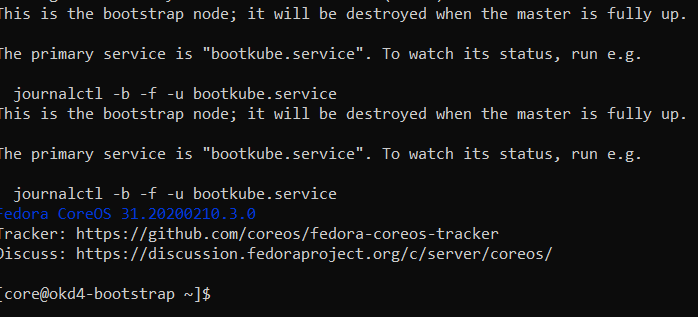
To watch the bootkube logs enter this command:
journalctl -b -f -u bootkube.service
The logs should look similar to this:
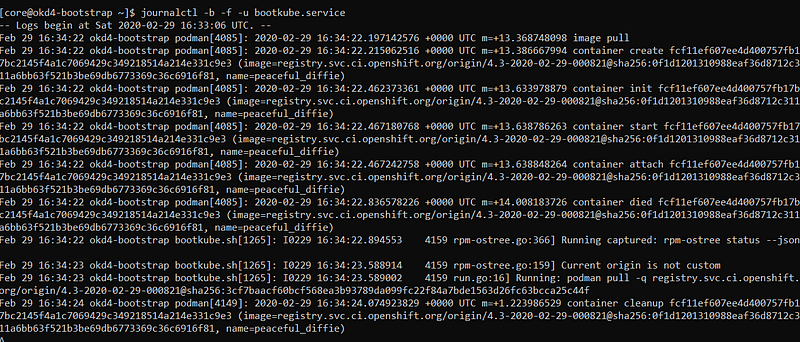
Keep an eye out for errors. This is updating the rpm-ostree and will take 3–10 minutes. The VM will reboot once completed and end your ssh session.
After the VM reboots reconnect to your bootstrap node via SSH again. Notice this time there is an error with the crio service. This appears to be an issue with the 4.3 branch but we will work around it:

Edit the /etc/crio/crio.conf file
sudo vi /etc/crio/crio.conf
Edit the line that sets the OCI hooks directories and change “/usr/share/containers/oci/hooks.d” to “/etc/containers/oci/hooks.d” and save.

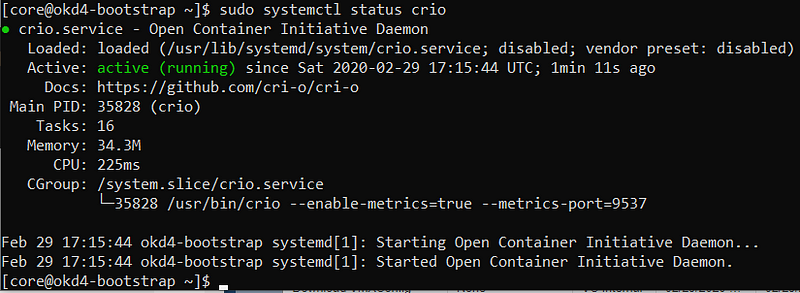
To verify crio is now working do systemctl status crio and you should see the service is now active:
sudo systemctl status crio
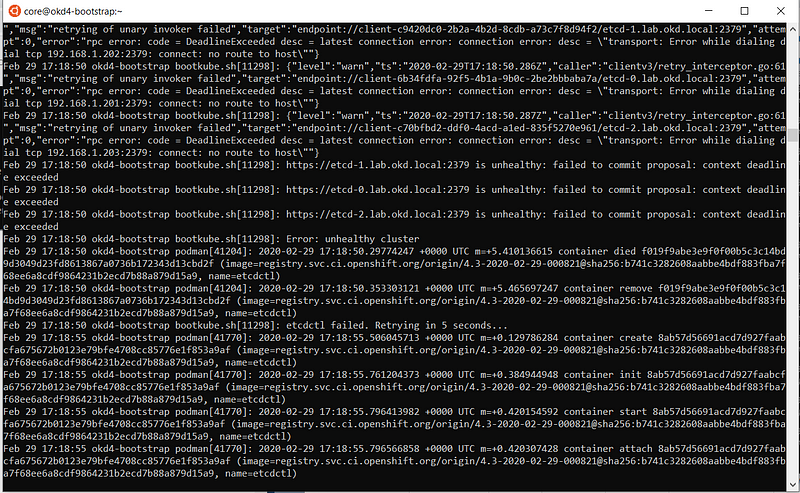
Now check the logs on the bootkube service:
journalctl -b -f -u bootkube.service
You will see it failing to check the etcd nodes and the logs report the cluster is unhealthy which means you are ready to power on the control nodes.
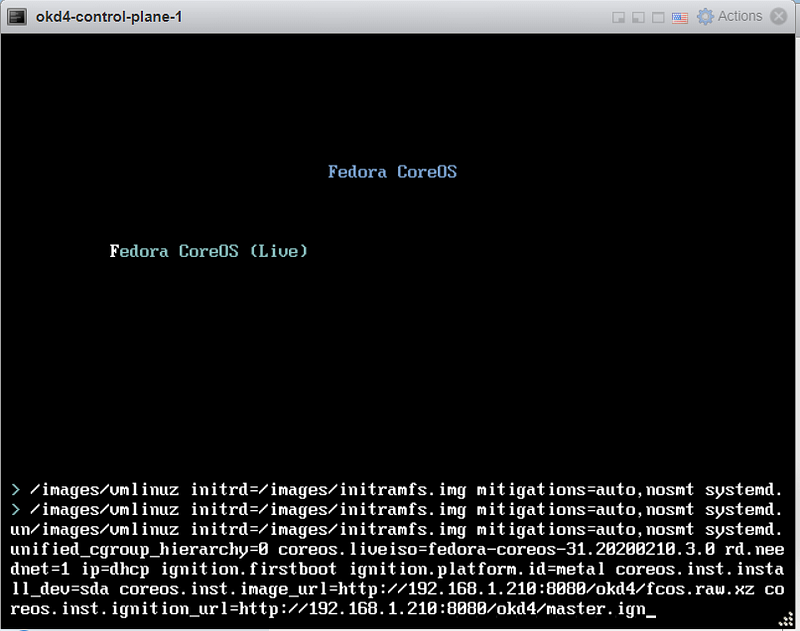
Starting the control plane nodes:
When powering on the control nodes press TAB to edit like before and use the following values (note the master.ign at the end):
coreos.inst.install_dev=sda
coreos.inst.image_url=http://192.168.1.210:8080/okd4/fcos.raw.xz
coreos.inst.ignition_url=http://192.168.1.210:8080/okd4/master.ign
Just like the bootstrap node you should that the fcos.raw.gz image and signature have been downloaded:
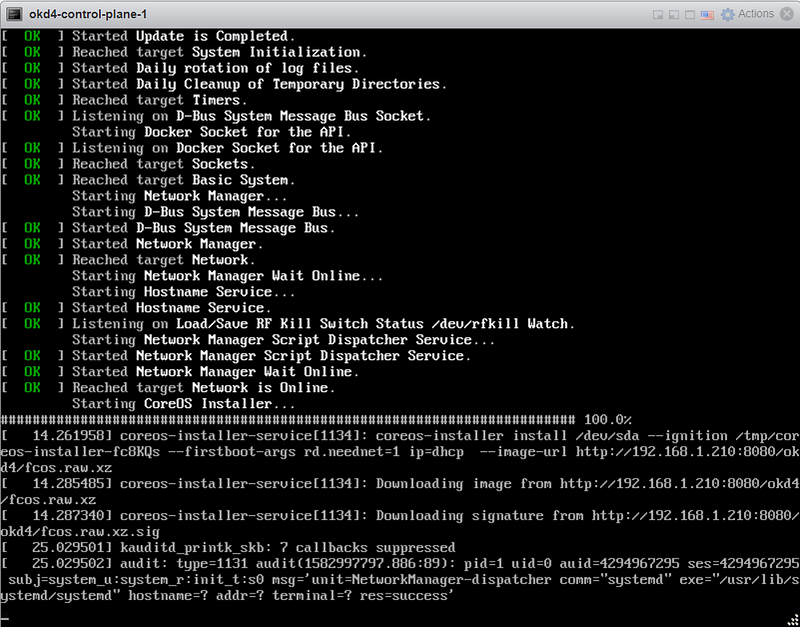
After the image is installed, the VM will restart to the login screen, begin to update the ostree, and then reboot once completed just like the bootstrap node:
After the 2nd reboot, you will need to ssh into the node from the okd4-services node and edit the crio.conf. Remove the line “/usr/share/containers/oci/hooks.d” and save your changes.

Now repeat the same process for the other two control nodes.
After the other two nodes have reached this point, you can monitor the bootstrap process from the okd4-services node:
openshift-install --dir=install_dir/ wait-for bootstrap-complete --log-level=info

Once the installer shows it is safe to remove the bootstrap node it is time to boot the compute nodes.
Note: At this point, you can shutdown your bootstrap node. Now is a good time to edit the /etc/haproxy/haproxy.cfg, comment out the bootstrap node, and restart the haproxy service.
sudo vi /etc/haproxy/haproxy.cfg
sudo systemctl restart haproxy
Starting the compute nodes:
When powering on the compute nodes press TAB to edit like before and use the following values (note the worker.ign at the end):
coreos.inst.install_dev=sda
coreos.inst.image_url=http://192.168.1.210:8080/okd4/fcos.raw.xz
coreos.inst.ignition_url=http://192.168.1.210:8080/okd4/worker.ign
Just like the other nodes you should that the fcos.raw.gz image and signature have been downloaded:
After the image is installed, the VM will restart to the login screen, begin to update the ostree, and then reboot once completed just like the other nodes:
After the 2nd reboot, you will need to ssh into the node from the okd4-services node and edit the crio.conf. Remove the line “/usr/share/containers/oci/hooks.d” and save your changes.
Now repeat the same process for the other worker node.
Login to the cluster and approve CSRs:
Now that the masters are online you should be able to login with the oc client. Use the following commands to log in and check the status of your cluster:
export KUBECONFIG=./install_dir/auth/kubeconfig
oc whoami
oc get nodes
oc get csr
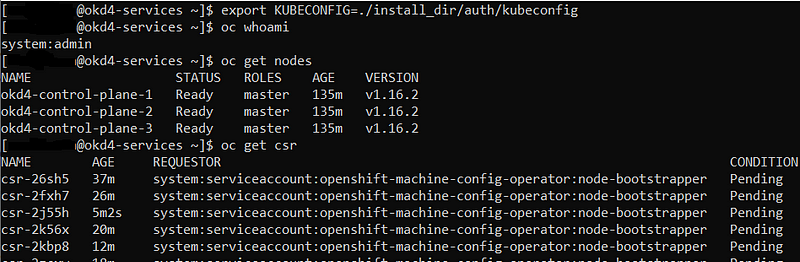
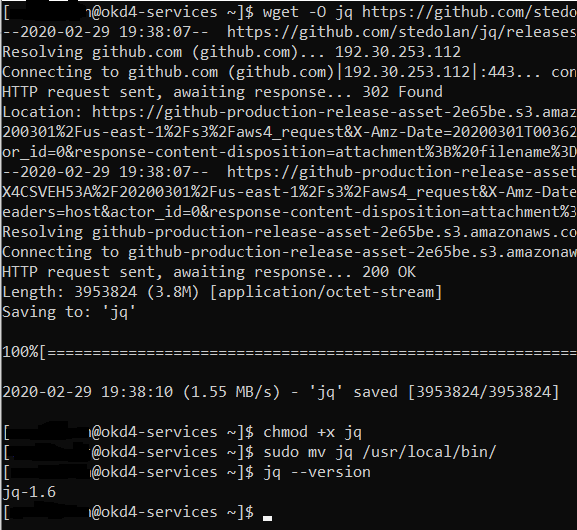
You should only see the master nodes but plenty of csr’s waiting for approval. Install the jq package to assist with approving multiple csr’s at once time.
wget -O jq https://github.com/stedolan/jq/releases/download/jq-1.6/jq-linux64
chmod +x jq
sudo mv jq /usr/local/bin/
jq --version
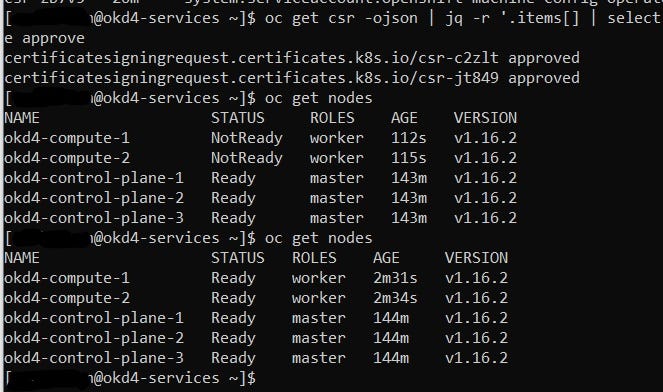
Approve all the pending certs and check your nodes:
oc get csr -ojson | jq -r '.items[] | select(.status == {} ) | .metadata.name' | xargs oc adm certificate approve
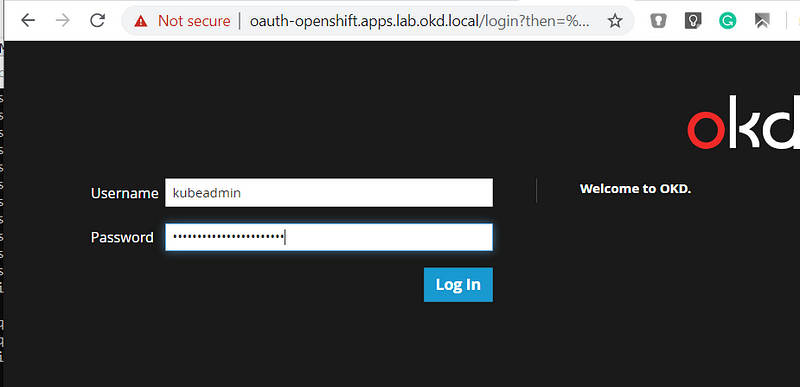
Log in to the web console using your workstation. Before you do, you will need to add console-openshift-console.apps.lab.okd.local to your workstation’s host file:
<workstation ip addr> console-openshift-console.apps.lab.okd.local
Also, get your kubeadmin password from the install_dir/auth folder.
cat install_dir/auth/kubeadmin-password
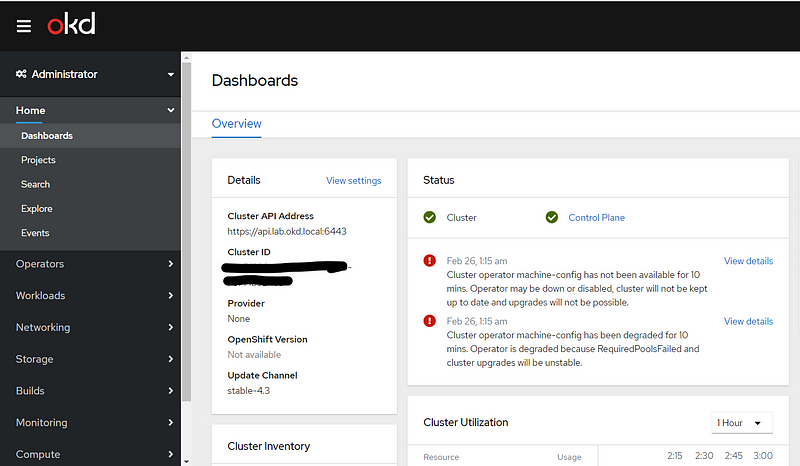
Check out that beautiful dashboard. Take a break and look around the admin panel.
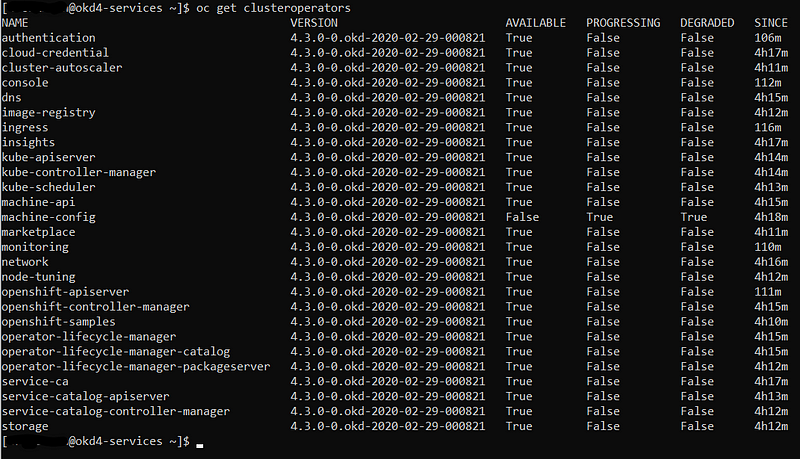
The only items remaining to be addressed are operators, persistent storage, and configuration of the registry.
Checking on Operators:
Even though the GUI is up there are operators that may still be in the process of coming online. To see a list of those operators and the respective status use the following command:
oc get clusteroperators
Persistent Storage:
We need to create some persistent storage for our registry before we can complete this project. Let’s configure our okd4-services VM as an NFS server and use it for persistent storage.
Login to your okd4-services VM and being to set up an NFS server. The following commands install the necessary packages, enable services, and configure file and folder permissions.
sudo yum install –y nfs-utils
sudo systemctl enable nfs-server rpcbind
sudo systemctl start nfs-server rpcbind nfs-lock-nfs-idmap
sudo mkdir –p /var/nfsshare/registry
sudo chmod –R 777 /var/nfsshare
sudo chown –R nfsnobody:nfsnobody /var/nfsshare
Create an NFS Export
sudo vi /etc/exports
Add this line in the new /etc/exports file “/var/nfsshare 192.168.1.0/24(rw,sync,no_root_squash,no_all_squash,no_wdelay)”

Restart the nfs-server service and add firewall rules:
sudo systemctl restart nfs-server
sudo firewall-cmd --permanent --zone=public --add-service mountd
sudo firewall-cmd --permanent --zone=public --add-service rpc-bind
sudo firewall-cmd --permanent --zone=public --add-service nfs
sudo firewall-cmd --reload
Registry configuration:
Create a persistent volume on the NFS share. Use the registry_py.yaml in okd4_files folder from the git repo:
oc create -f okd4_files/registry_pv.yaml
oc get pv

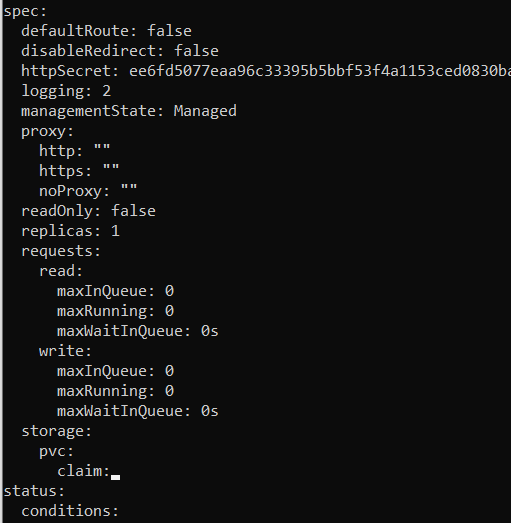
Edit the image-registry operator:
oc edit configs.imageregistry.operator.openshift.io
Change the managmentState: from Removed to Managed. Under storage: add the pvc: and claim: blank to automatically attach the PV and save your changes:
managementStage: Managed
storage:
    pvc:
      claim:
Check your persistent volume, it should have been claimed:
oc get pv

To test the registry and underlying storage, create a new php project in OKD and use the example repository. After it has been built you can check your NFS export on okd4-services for data:

The end.
Known Issues:
The cluster operator machine-config error shown below is a known issue in OKD 4.3 and has been resolved in OKD 4.4 which is the recommended version.