Updated: 5/26/2020
This guide is deprecated. Please use the new guide for OKD 4.5 at https://medium.com/@craig_robinson/guide-installing-an-okd-4-5-cluster-508a2631cbee
OKD is the upstream and community-supported version of the Red Hat OpenShift Container Platform (OCP). OpenShift expands vanilla Kubernetes into an application platform designed for enterprise use at scale. Starting with the release of OpenShift 4, the default operating system is Red Hat CoreOS, which provides an immutable infrastructure and automated updates. Fedora CoreOS, like OKD, is the upstream version of Red Hat CoreOS.
For those of you who have a Home Lab, you can gain some experience with OpenShift by using the open-source upstream combination of OKD and FCOS (Fedora CoreOS) to build your own cluster.
Experience is an excellent way to learn new technologies. Used hardware for a home lab that could run an OKD cluster is relatively inexpensive these days ($250–$350), especially when compared to a cloud-hosted solution costing over $250 per month.
The purpose of this guide is to help you successfully build an OKD 4.4 cluster at home that you can take for a test drive. VMWare is the example hypervisor used in this guide, but you could use Hyper-V, libvirt, VirtualBox, bare metal, or other platforms.
This guide assumes you have a virtualization platform, basic knowledge of Linux, and the ability to Google.
Note: In this tutorial, I use a 192.168.1.0/24 network for OKD. If you already use 192.168.1.0/24 be sure to use a different IP scheme for your OKD environment. An alternate network would be 192.168.100.0/24 for example.
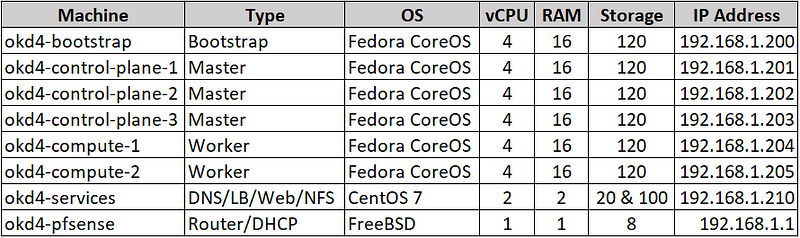
VM Overview:
For my installation, I used an ESXi 6.5 host with 96GB of RAM and a separate VLAN configured for OKD. Here is a breakdown of the virtual machines:
Note: “There are terraform scripts available to setup vSphere-enabled kubelet” -/r/roignac. I chose not to use the scripts as it added an extra layer of complexity, but they are available.

Create a new network in VMWare for OKD:
Login to your VMWare Host. Select Networking → Port Groups → Add port group. Setup an OKD network on an unused VLAN, in my instance, VLAN 20.
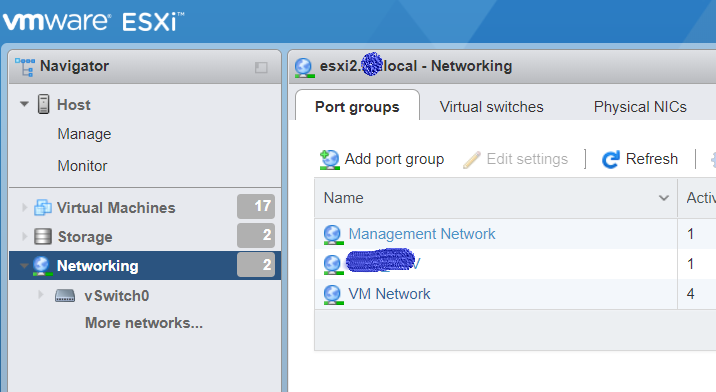

Name your Group and set your VLAN ID.
Create a pfSense VM:
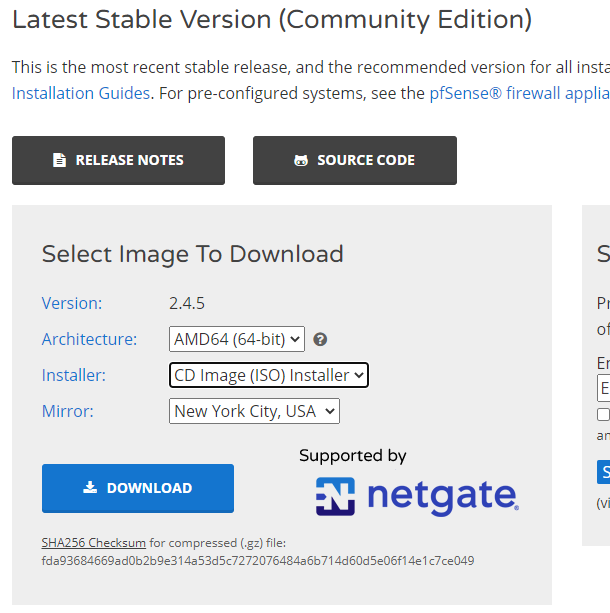
Download the pfSense ISO and upload it to your ESXi host’s datastore.
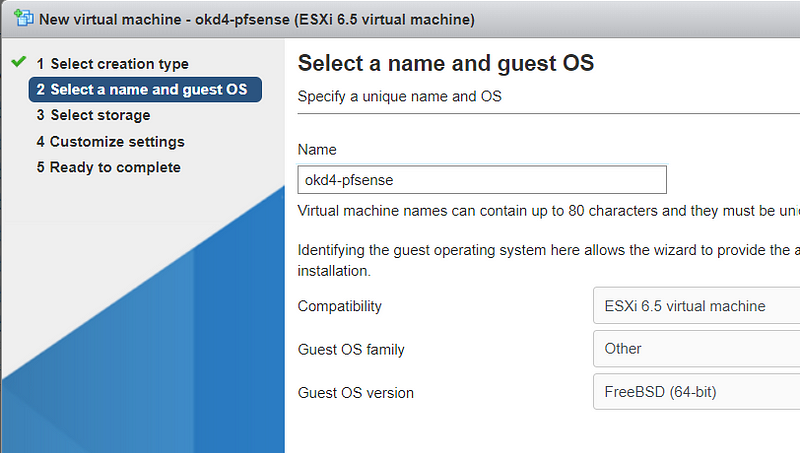
Create a new Virtual Machine. Choose Guest OS as Other and Select FreeBSD 64-bit.
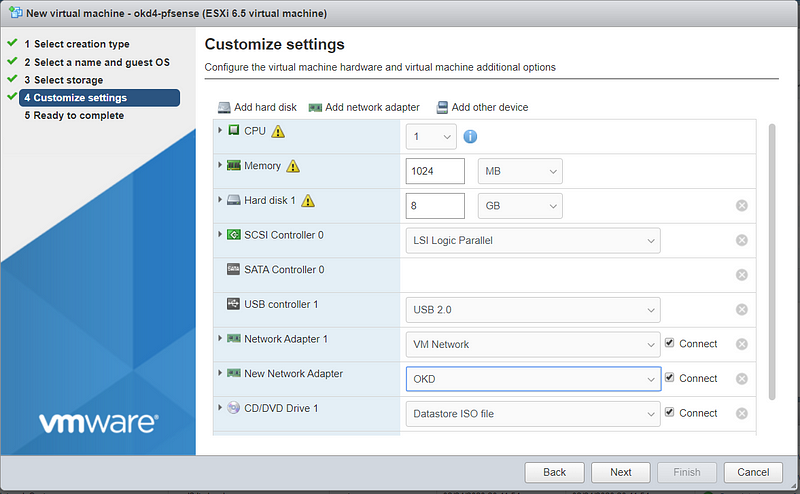
Use the default template settings for resources. I prefer to thin provision my disks for non-production use.
Select your home network for Network Adapter 1, and add a new network adapter using the OKD network.
Setup pfSense:
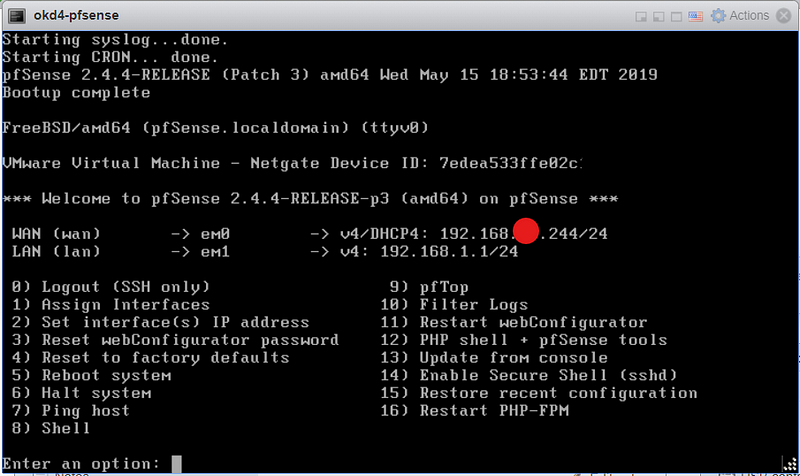
Power on your pfSense VM and run through the installation using all the default values. After completion your VM console should look like this:
Using the VMWare console on the pfSense VM, select option 8 to access the shell. Add a firewall rule by typing “ easyrule pass wan tcp any any 443”. Next, type “pfctl –d” to turn off the packet filter temporarily. This rule allows you to access the pfSense web GUI from your workstation.
Source: https://docs.j7k6.org/pfsense-wan-webinterface/
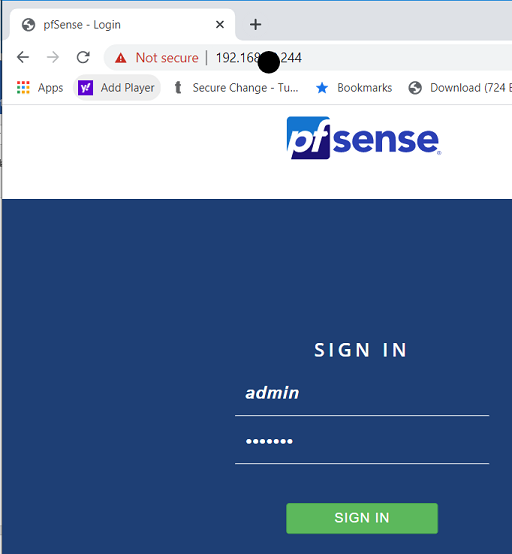
Login to pfSense via your web-browser. The default username is “admin” and the password is “pfsense”.
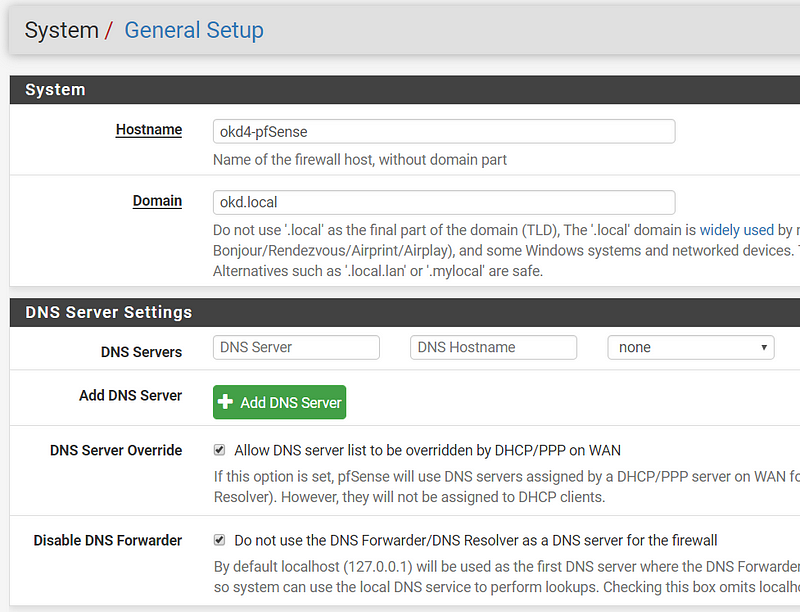
After logging in, click next and use “okd4-pfsense” for hostname and “okd.local” for the domain. Also, enable DNS Server Override and Disable DNS Forwarder. Next.
Select your Timezone. Next.
Use Defaults for WAN Configuration. Uncheck “Block RFC1918 Private Networks” since your home network is the “WAN” in this setup. Next.

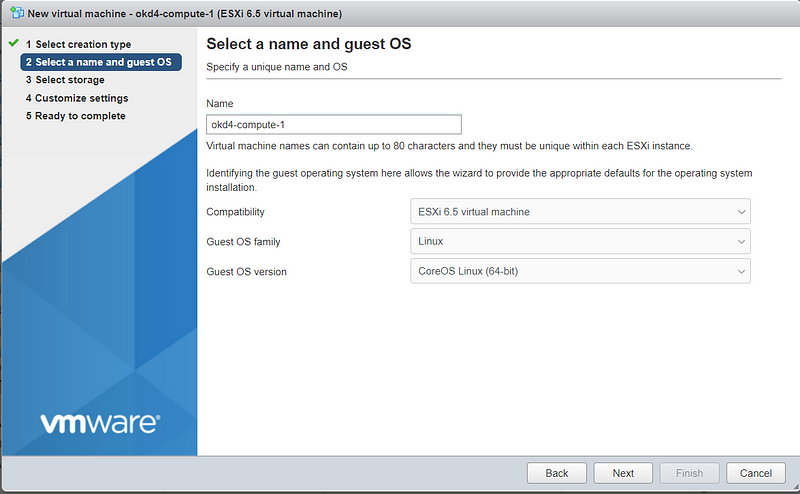
Create bootstrap, master, and worker nodes:
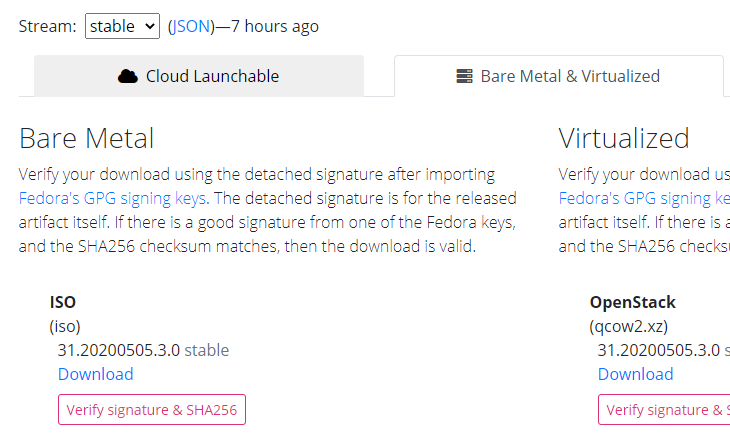
Download the Fedora CoreOS Bare Metal ISO and upload it to your ESXi datastore.
The latest stable version at the time of writing is 31.20200505.3.0
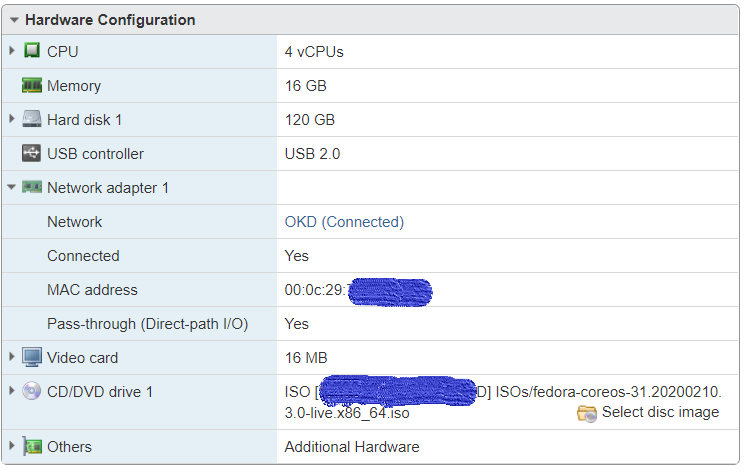
Create the six ODK nodes (bootstrap, master, worker) on your ESXi host using the values in the spreadsheet:
Note: I had to increase my compute nodes to 4 vCPU to deploy some image-pruner pods. YMMV.
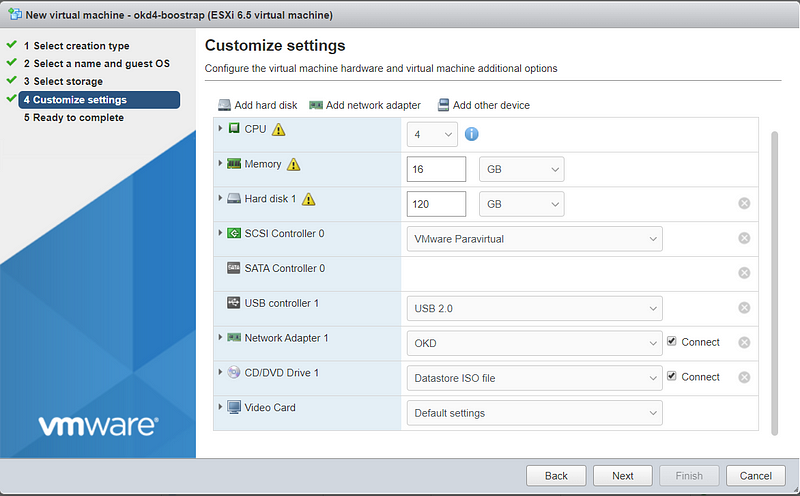
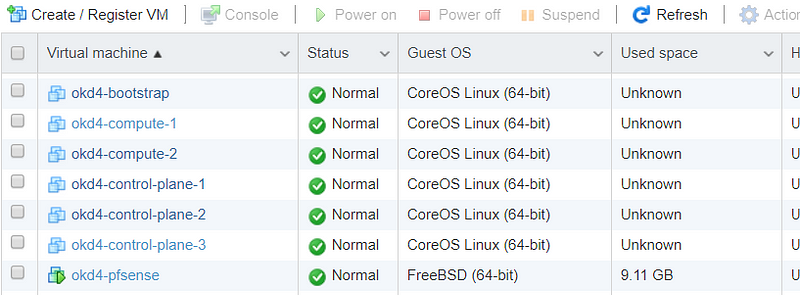
You should end up with the following VMs:
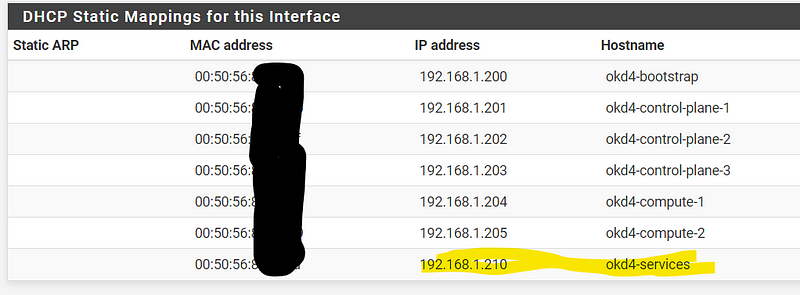
Setup DHCP reservations:
Compile a list of the OKD nodes MAC addresses by viewing the hardware configuration of your VMs.
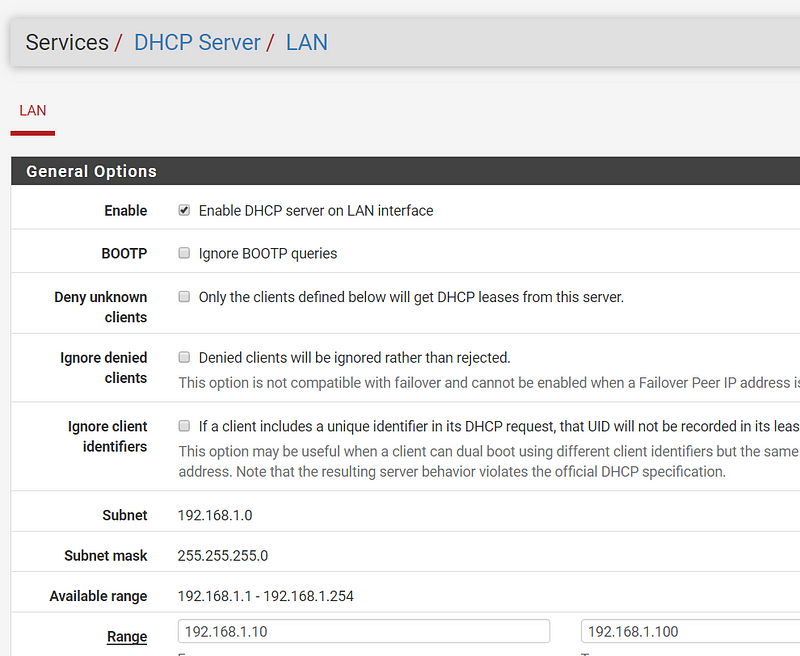
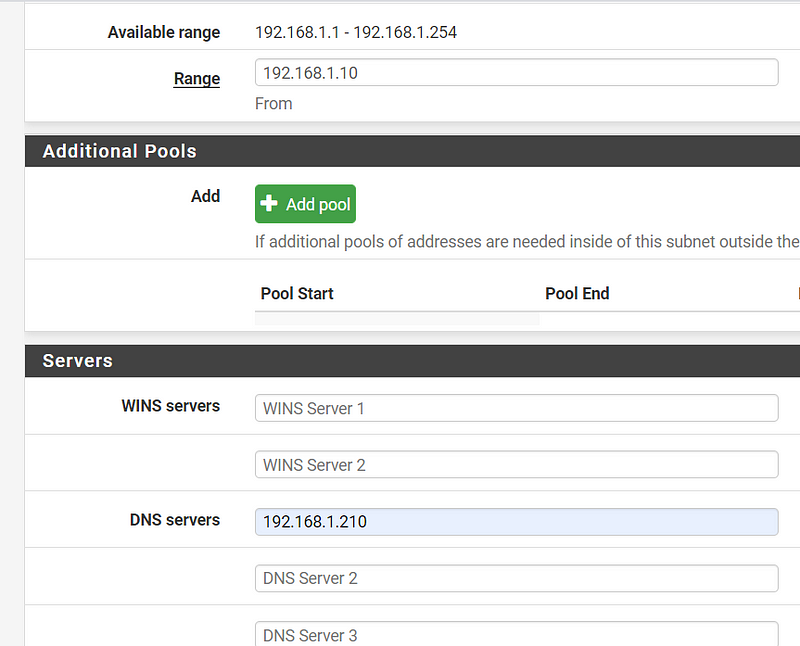
Login into pfSense. Go to Services → DHCP Server and change your ending range IP to 192.168.1.99, then click Save.
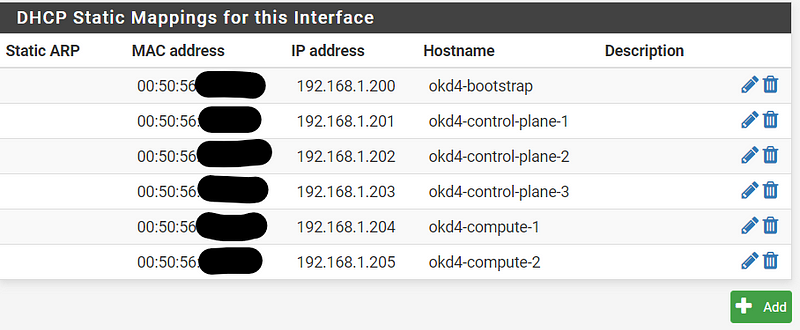
On the DHCP Server, page click Add at the bottom.

Fill in the MAC Address, IP Address, and Hostname, then click save. Do this for each ODK VM. Click Apply Changes at the top of the page when complete.
Create and set up VM to host various services:
The okd4-services VM is used to provide DNS, NFS exports, web server, and load balancing.
Download CentOS 7 minimal ISO (no GUI) and upload it to your ESXi datastore. Example: CentOS-7-x86_64-Minimal-1908.iso
*Note* Other users have reported issues with CentOS 8, I recommend using CentOS 7.
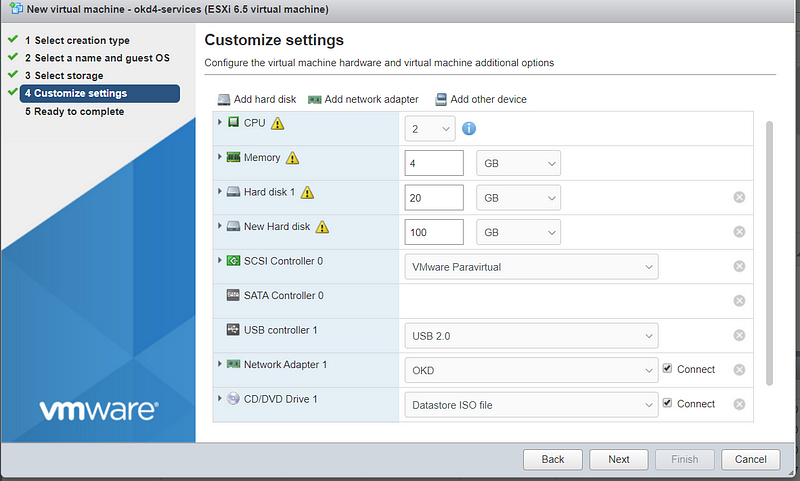
Create your okd4-services virtual machine. The 20GB drive is for the OS. The 100GB drive is for NFS and persistent storage for the OpenShift registry.
After creating the VM, copy the MAC address on the VM Hardware configuration page and set up a DHCP Reservation for this VM using the IP address 192.168.1.210. Hit “Apply Changes” at the top of the DHCP page when completed.
Power on the okd4-services VM.
Run through a typical CentOS 7 install, use the 20GB drive to install the OS. On the networking page, it should pull the 192.168.1.210 IP address from DHCP. Set a root password and an admin user.

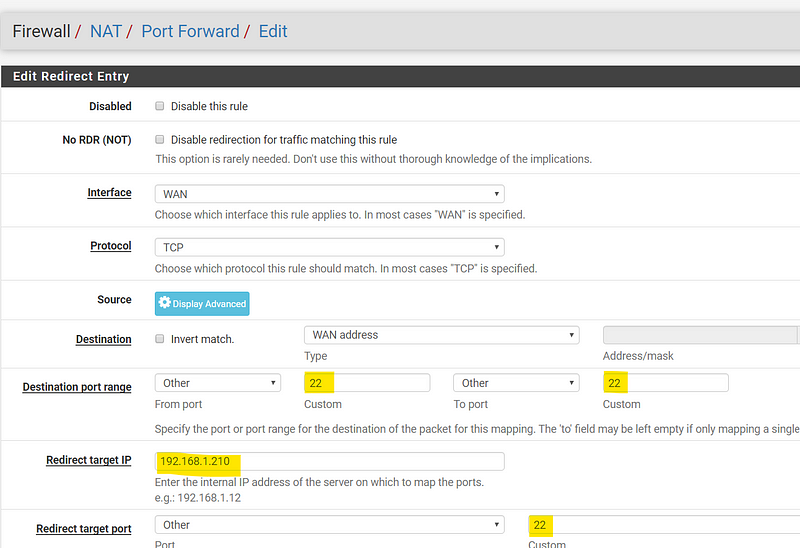
While CentOS is installing, go to the pfSense GUI and setup a port forward to the okd4-services for remote ssh/scp access. This rule allows you to ssh from your workstation to copy and paste bash commands easily. Go to Firewall → NAT → Port Forward → Add
Destination port range “22” to “22”; redirect target IP “192.168.1.210”; redirect target port “22”
Click Save, then Apply Changes.
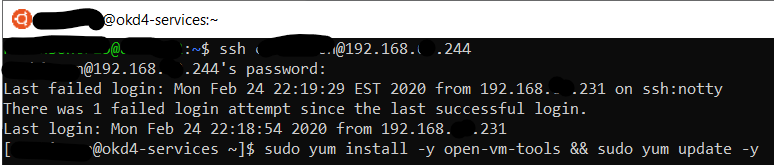
Reboot the okd4-services VM after installation and ssh to the WAN IP of your pfSense VM that you port forwarded to the okd4-services server.
ssh user@pfsense_ip
Install open-vm-tools, vim, wget, and git packages. Also, yum update the OS and reboot after completion.
sudo yum install –y open-vm-tools vim wget git && sudo yum update –y && sudo init 6
After updated and a restart. Use git to download the DNS, HAProxy, and install-conf.yaml example files via git:
git clone https://github.com/cragr/okd4_files.git
cd okd4_files
Install bind (DNS)
sudo yum -y install bind bind-utils
Copy the named config files and zones:
sudo cp named.conf /etc/named.conf
sudo cp named.conf.local /etc/named/
sudo mkdir /etc/named/zones
sudo cp db* /etc/named/zones
Enable and start named:
sudo systemctl enable named
sudo systemctl start named
sudo systemctl status named
Create firewall rules:
sudo firewall-cmd --permanent --add-port=53/udp
sudo firewall-cmd --reload
Set the DNS server IP to 192.168.1.210 in the pfSense DHCP server settings. Services → DHCP → Servers
Restart the network services on the okd4-services VM:
sudo systemctl restart network.service
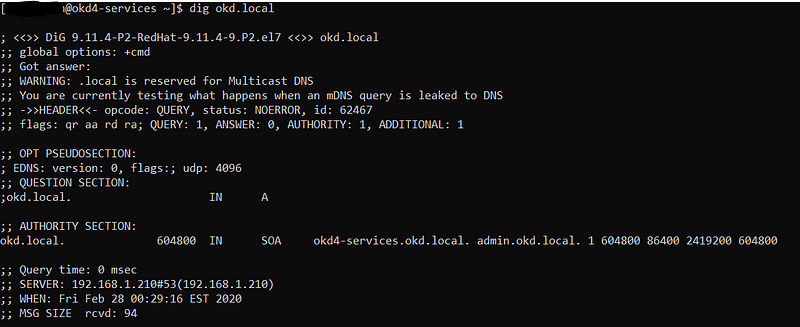
Test DNS on the okd4-services
dig okd.local
dig –x 192.168.1.210
Install HAProxy:
sudo yum install haproxy
Copy haproxy config from the git okd4_files directory :
sudo cp haproxy.cfg /etc/haproxy/haproxy.cfg
Start, enable, and verify HA Proxy service:
sudo setsebool -P haproxy_connect_any 1
sudo systemctl enable haproxy
sudo systemctl start haproxy
sudo systemctl status haproxy
Add OKD firewall ports:
sudo firewall-cmd --permanent --add-port=6443/tcp
sudo firewall-cmd --permanent --add-port=22623/tcp
sudo firewall-cmd --permanent --add-service=http
sudo firewall-cmd --permanent --add-service=https
sudo firewall-cmd --reload
Install Apache/HTTPD
sudo yum install –y httpd
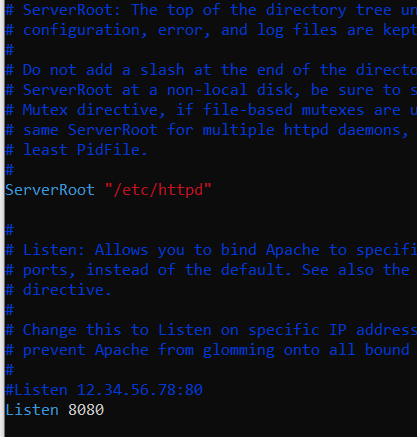
Change httpd to listen port to 8080:
sudo vim /etc/httpd/conf/httpd.conf
Change “Listen 80” to “Listen 8080” around line 42:
Enable and Start httpd service/Allow port 8080 on the firewall:
sudo setsebool -P httpd_read_user_content 1
sudo systemctl enable httpd
sudo systemctl start httpd
sudo firewall-cmd --permanent --add-port=8080/tcp
sudo firewall-cmd –reload
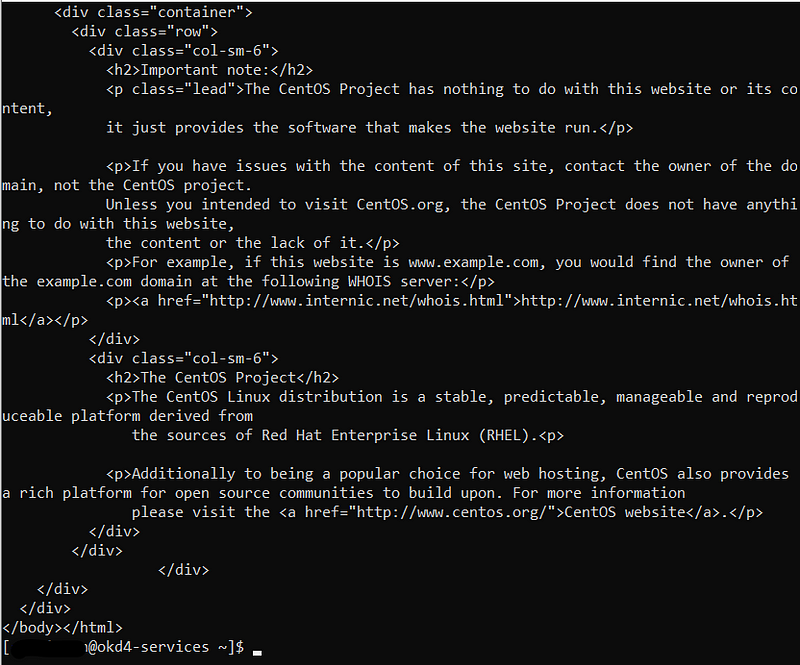
Test the webserver:
curl localhost:8080
pfSense Tweaks
To access OKD on port 443 from your home network, we need to change the management port on the pfSense like so:
Add 4433 to Firewall rule on PFSense; Firewall → Rules → WAN → Add
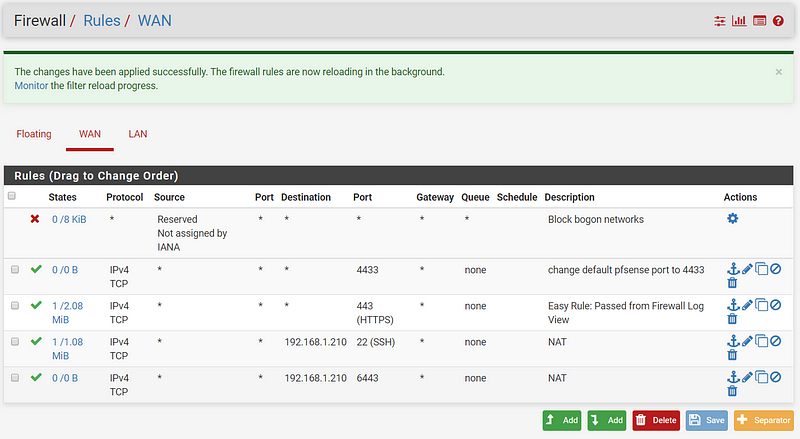
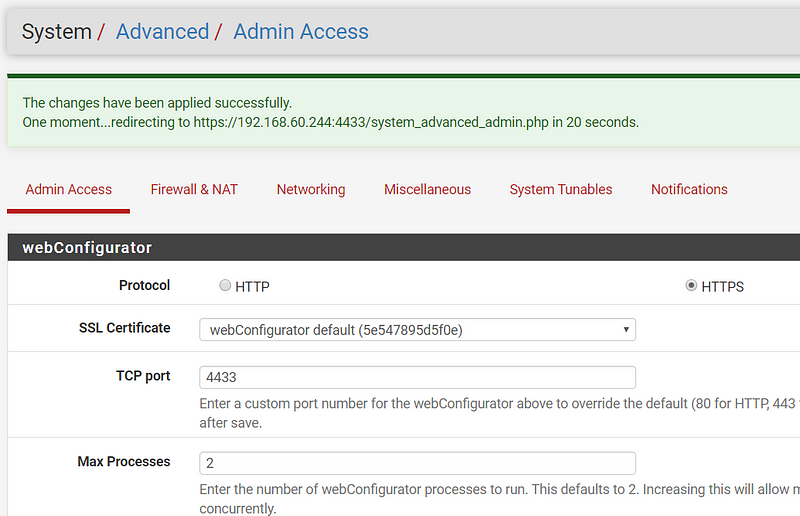
Change PFSense default port to 4433; System → Advanced → TCP Port Change to 4433
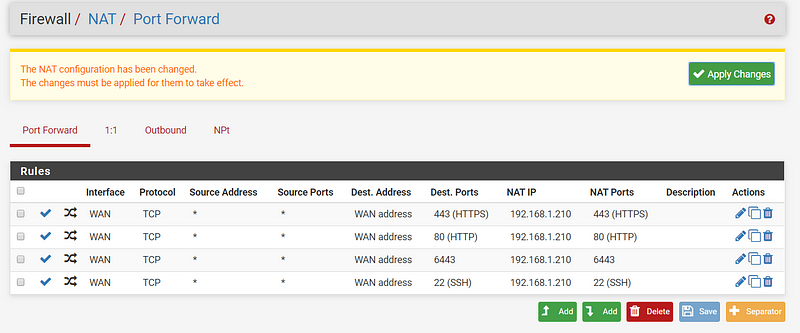
Add 6443, 80, 443 port-forward rules to okd4-services for access from your home network.
Congratulations, You Are Half Way There!
Congrats! You should now have a separate home lab environment setup and ready for ODK. Now we can start the install.
Download the openshift-installer and oc client:
SSH to the okd4-services VM
To download the latest oc client and openshift-install binaries, you need to use an existing version of the oc client.
Download the 4.4 version of the oc client and openshift-install from the OKD releases page. Example:
wget https://github.com/openshift/okd/releases/download/4.4.0-0.okd-2020-05-23-055148-beta5/openshift-client-linux-4.4.0-0.okd-2020-05-23-055148-beta5.tar.gz
wget https://github.com/openshift/okd/releases/download/4.4.0-0.okd-2020-05-23-055148-beta5/openshift-install-linux-4.4.0-0.okd-2020-05-23-055148-beta5.tar.gz
Extract the okd version of the oc client and openshift-install:
tar -zxvf openshift-client-linux-4.4.0-0.okd-2020-05-23-055148-beta5.tar.gz
tar -zxvf openshift-install-linux-4.4.0-0.okd-2020-05-23-055148-beta5.tar.gz
Move the kubectl, oc, and openshift-install to /usr/local/bin and show the version:
sudo mv kubectl oc openshift-install /usr/local/bin/
oc version
openshift-install version
The latest and recent releases are available at https://origin-release.svc.ci.openshift.org
Setup the openshift-installer:
In the install-config.yaml, you can either use a pull-secret from RedHat or apply a bypass fix. For the bypass use “{“auths”:{“fake”:{“auth”: “bar”}}}” as the pull-secret.
Generate an SSH key if you do not already have one.
Create an install directory and copy the install-config.yaml file:
cd ~
mkdir install_dir
cp okd4_files/install-config.yaml ./install_dir
Edit the install-config.yaml in the install_dir, insert your pull secret and ssh key, and backup the install-config.yaml as it will be deleted in the next step:
sudo vim ./install_dir/install-config.yaml
cp ./install_dir/install-config.yaml ./install_dir/install-config.yaml.bak
Generate the Kubernetes manifests for the cluster, ignore the warning:
openshift-install create manifests --dir=install_dir/
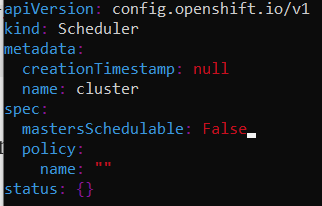
Modify the cluster-scheduler-02-config.yaml manifest file to prevent Pods from being scheduled on the control plane machines:
vim install_dir/manifests/cluster-scheduler-02-config.yml
Locate the mastersSchedulable parameter and change the value to False :
Now you can create the ignition-configs:
openshift-install create ignition-configs --dir=install_dir/
Note: If you reuse the install_dir, make sure it is empty. Hidden files are created after generating the configs, and they should be removed before you use the same folder on a 2nd attempt.
Host ignition and Fedora CoreOS files on the webserver:
Create okd4 directory in /var/www/html:
sudo mkdir /var/www/html/okd4
Copy the install_dir contents to /var/www/html/okd4 and set permissions:
sudo cp -R install_dir/* /var/www/html/okd4/
sudo chown -R apache: /var/www/html/
sudo chmod -R 755 /var/www/html/
Test the webserver:
curl localhost:8080/okd4/metadata.json
Download the Fedora CoreOS bare-metal bios image and sig files and shorten the file names:
cd /var/www/html/okd4/
sudo wget https://builds.coreos.fedoraproject.org/prod/streams/stable/builds/31.20200505.3.0/x86_64/fedora-coreos-31.20200505.3.0-metal.x86_64.raw.xz
sudo wget https://builds.coreos.fedoraproject.org/prod/streams/stable/builds/31.20200505.3.0/x86_64/fedora-coreos-31.20200505.3.0-metal.x86_64.raw.xz.sig
sudo mv fedora-coreos-31.20200505.3.0-metal.x86_64.raw.xz fcos.raw.xz
sudo mv fedora-coreos-31.20200505.3.0-metal.x86_64.raw.xz.sig fcos.raw.xz.sig
sudo chown -R apache: /var/www/html/
sudo chmod -R 755 /var/www/html/
Starting the bootstrap node:
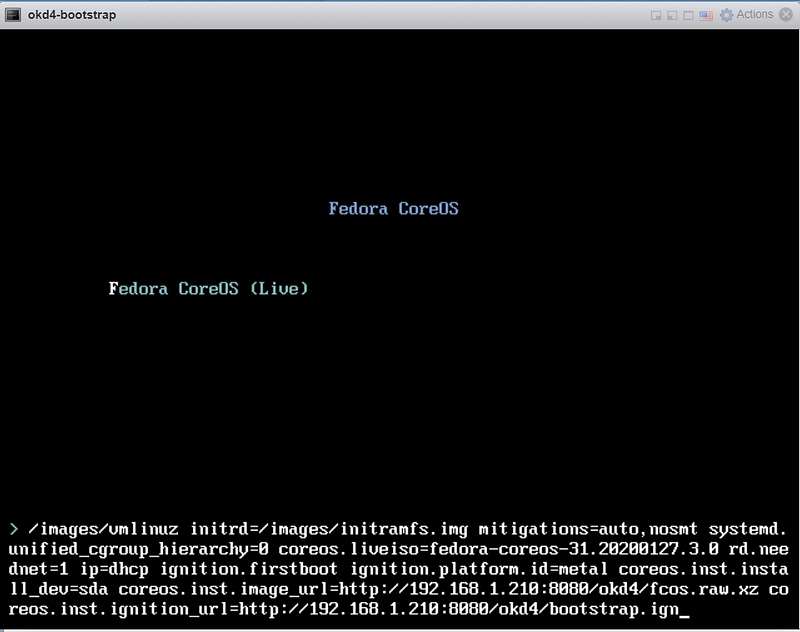
Power on odk4-bootstrap VM. Press the TAB key to edit the kernel boot options and add the following:
coreos.inst.install_dev=/dev/sda
coreos.inst.image_url=http://192.168.1.210:8080/okd4/fcos.raw.xz
coreos.inst.ignition_url=http://192.168.1.210:8080/okd4/bootstrap.ign
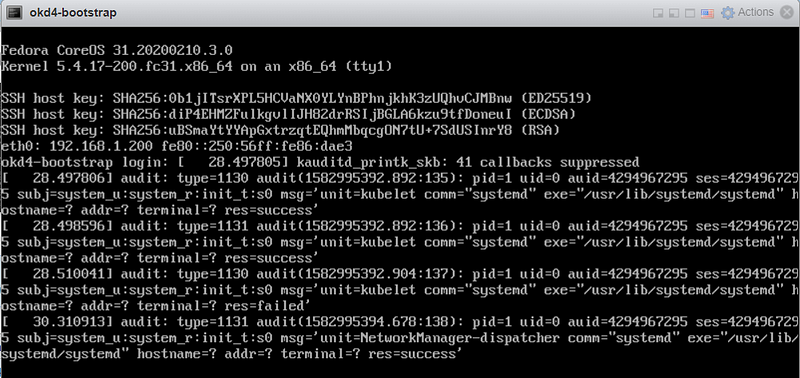
You should see that the fcos.raw.gz image and signature have been downloaded:

After installation of the image, the VM restarts to the login screen and begins to show the following (do not panic, this is normal):
The console window shows many messages during the install and restarts several times. It’s time to start the control plane and compute nodes.
Starting the control plane nodes:
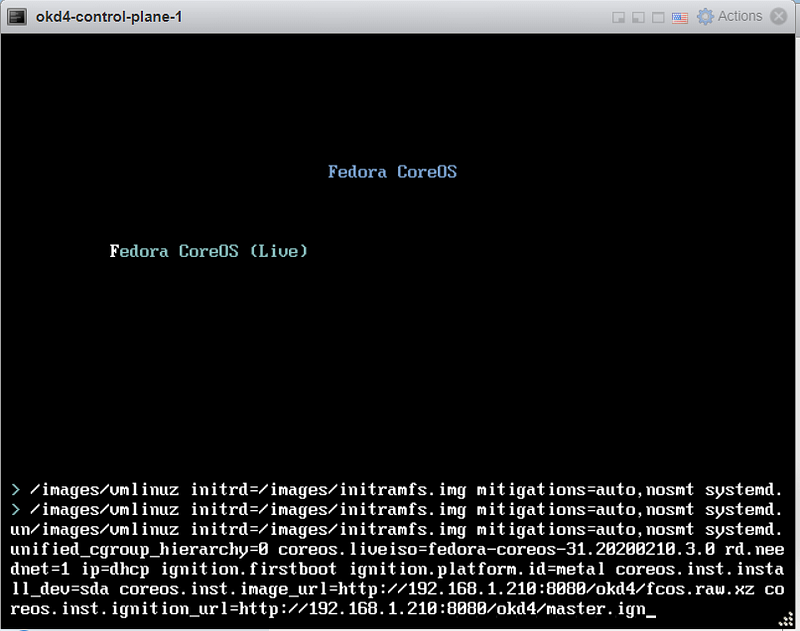
When powering on the control nodes press TAB to edit like before and use the following values (note the master.ign at the end):
coreos.inst.install_dev=/dev/sda
coreos.inst.image_url=http://192.168.1.210:8080/okd4/fcos.raw.xz
coreos.inst.ignition_url=http://192.168.1.210:8080/okd4/master.ign
Just like the bootstrap node, you should see that the fcos.raw.gz image and signature have been downloaded:
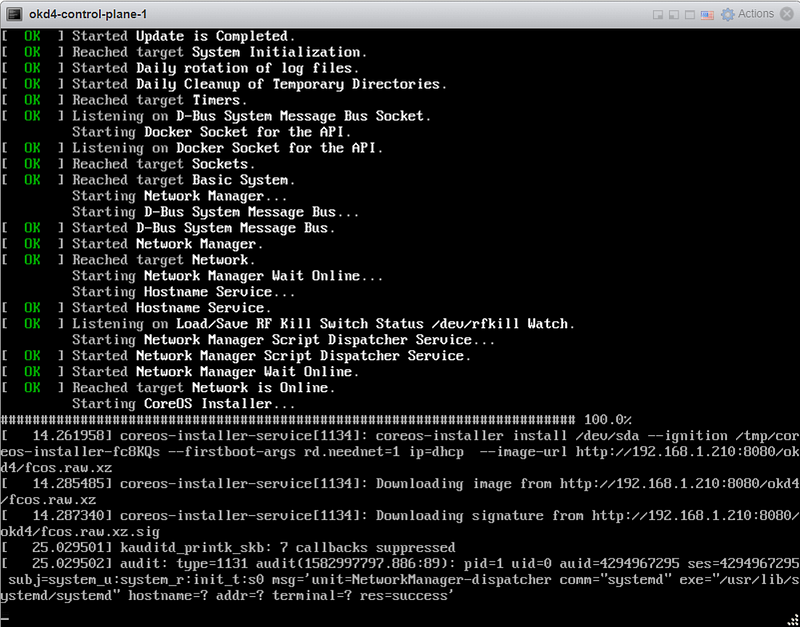
After installing the image is installed, the VM restarts to the login screen, begin to update ostree, and then reboot once completed just like the bootstrap node:
Now repeat the same process for the other two control nodes and compute nodes.
Starting the compute nodes:
When powering on the compute nodes press TAB to edit like before and use the following values (note the worker.ign at the end):
coreos.inst.install_dev=/dev/sda
coreos.inst.image_url=http://192.168.1.210:8080/okd4/fcos.raw.xz
coreos.inst.ignition_url=http://192.168.1.210:8080/okd4/worker.ign

Just like the other nodes, you should see that the fcos.raw.gz image and signature have been downloaded:
After installing the image, the VM restarts to the login screen, begin to update ostree, and then reboot once completed just like the other nodes:
Now repeat the same process for the other worker node.
Monitor the bootstrap installation:
You can monitor the bootstrap process from the okd4-services node:
openshift-install --dir=install_dir/ wait-for bootstrap-complete --log-level=info

Note: At this point, in the image above, you can shutdown your bootstrap node. Now is a good time to edit the /etc/haproxy/haproxy.cfg, comment out the bootstrap node, and restart the haproxy service.
sudo vi /etc/haproxy/haproxy.cfg
sudo systemctl restart haproxy
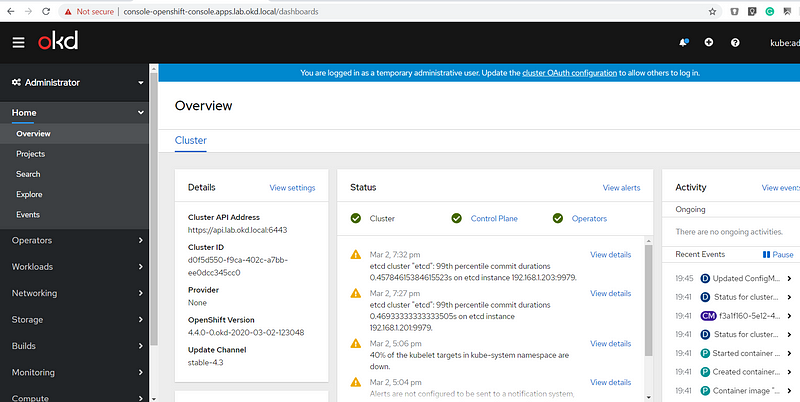
Login to the cluster and approve CSRs:
Now that the masters are online, you should be able to login with the oc client. Use the following commands to log in and check the status of your cluster:
export KUBECONFIG=~/install_dir/auth/kubeconfig
oc whoami
oc get nodes
oc get csr
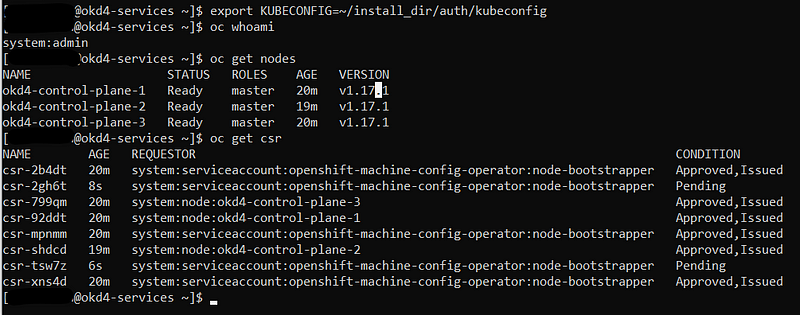
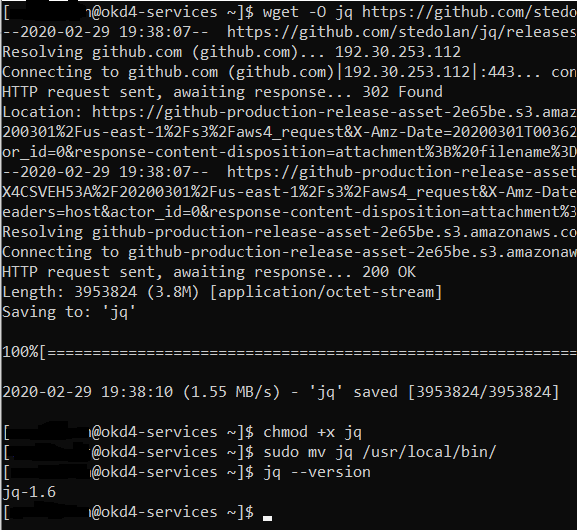
You should only see the master nodes and several CSR’s waiting for approval. Install the jq package to assist with approving multiple CSR’s at once time.
wget -O jq https://github.com/stedolan/jq/releases/download/jq-1.6/jq-linux64
chmod +x jq
sudo mv jq /usr/local/bin/
jq --version
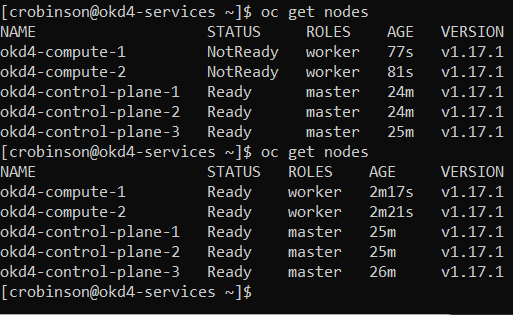
Approve all the pending certs and check your nodes:
oc get csr -ojson | jq -r '.items[] | select(.status == {} ) | .metadata.name' | xargs oc adm certificate approve
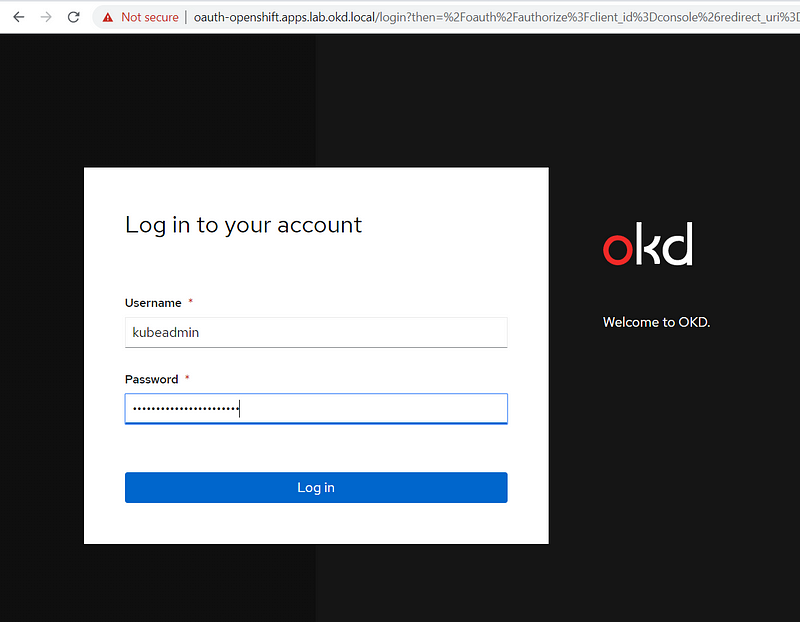
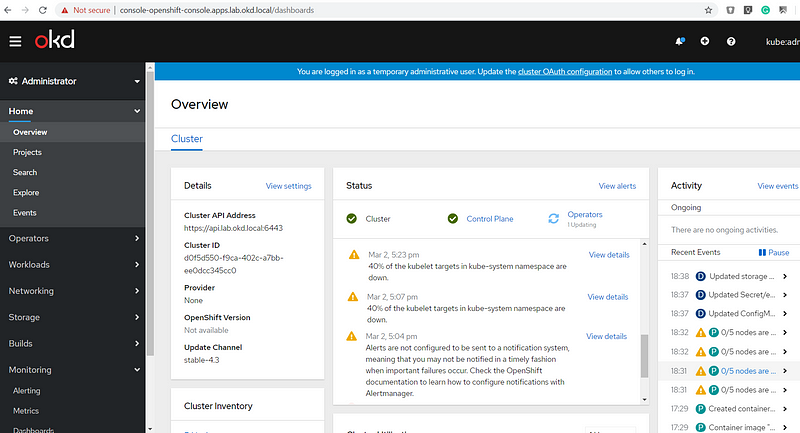
Log in to the web console using your workstation. Before you do, add console-openshift-console.apps.lab.okd.local to your workstation’s hosts file :
<workstation ip addr> console-openshift-console.apps.lab.okd.local
Also, get your kubeadmin password from the install_dir/auth folder and login to the web console:
cat install_dir/auth/kubeadmin-password
The only items remaining are the operators, persistent storage, and configuration of the registry.
Checking Cluster Operators:
Even though the GUI is up, some operators may still be in the process of coming online. To see a list of those operators and the respective status use the following command:
oc get clusteroperators

Persistent Storage:
We need to create some persistent storage for our registry before we can complete this project. Let’s configure our okd4-services VM as an NFS server and use it for persistent storage.
Login to your okd4-services VM and begin to set up an NFS server. The following commands install the necessary packages, enable services, and configure file and folder permissions.
sudo yum install –y nfs-utils
sudo systemctl enable nfs-server rpcbind
sudo systemctl start nfs-server rpcbind nfs-lock-nfs-idmap
sudo mkdir –p /var/nfsshare/registry
sudo chmod –R 777 /var/nfsshare
sudo chown –R nfsnobody:nfsnobody /var/nfsshare
Create an NFS Export
sudo vi /etc/exports
Add this line in the new /etc/exports file “/var/nfsshare 192.168.1.0/24(rw,sync,no_root_squash,no_all_squash,no_wdelay)”

Restart the nfs-server service and add firewall rules:
sudo setsebool -P nfs_export_all_rw 1
sudo systemctl restart nfs-server
sudo firewall-cmd --permanent --zone=public --add-service mountd
sudo firewall-cmd --permanent --zone=public --add-service rpc-bind
sudo firewall-cmd --permanent --zone=public --add-service nfs
sudo firewall-cmd --reload
Registry configuration:
Create a persistent volume on the NFS share. Use the registry_py.yaml in okd4_files folder from the git repo:
oc create -f okd4_files/registry_pv.yaml
oc get pv

Edit the image-registry operator:
oc edit configs.imageregistry.operator.openshift.io
Change the managmentState: from Removed to Managed. Under storage: add the pvc: and claim: blank to attach the PV and save your changes automatically:
managementStage: Managed
storage:
    pvc:
      claim:
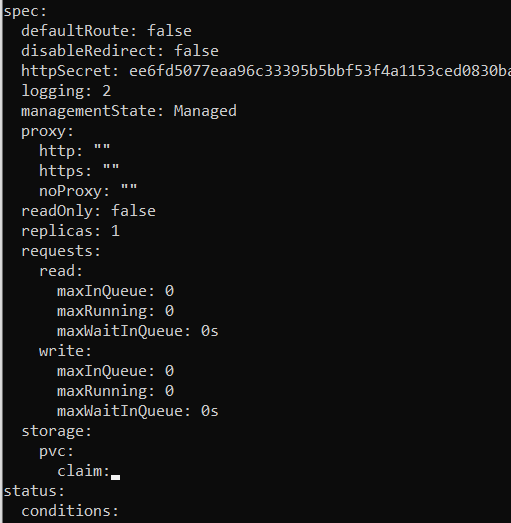
Check your persistent volume, and it should now be claimed:
oc get pv

To test the registry and underlying storage, create a new php project in OKD and use the example repository. Check your NFS export on okd4-services for data:

Create WordPress Project:
Create a new project.
oc new-project wordpress-test
Create a new app using the centos php73 s2i image from dockerhub and use the WordPress GitHub repo for the source. Also expose the service to create a route.
oc new-app centos/php-73-centos7~https://github.com/WordPress/WordPress.git
oc expose svc/wordpress
Create a new app using the centos7 mariadb image.
oc new-app centos/mariadb-103-centos7 --name mariadb --env MYSQL_DATABASE=wordpress --env MYSQL_USER=wordpress --env MYSQL_PASSWORD=wordpress
Open the route url and setup WordPress using mariadb (the service name) as the database host.
HTPasswd Setup:

The kubeadmin is a temporary user. The easiest way to set up a local user is with htpasswd.
htpasswd -c -B -b </path/to/users.htpasswd> <user_name> <password>
Create a secret in the openshift-config project using the users.htpasswd file you generated:
oc create secret generic htpass-secret --from-file=htpasswd=users.htpasswd -n openshift-config
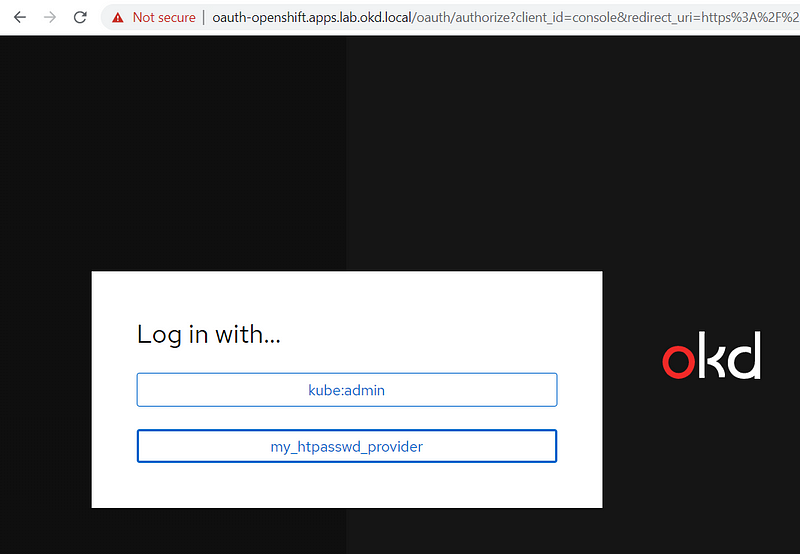
Add the identity provider.
oc apply -f okd4_files/htpasswd_provider.yaml
Login with my_htpasswd_provider using the username and password you created:
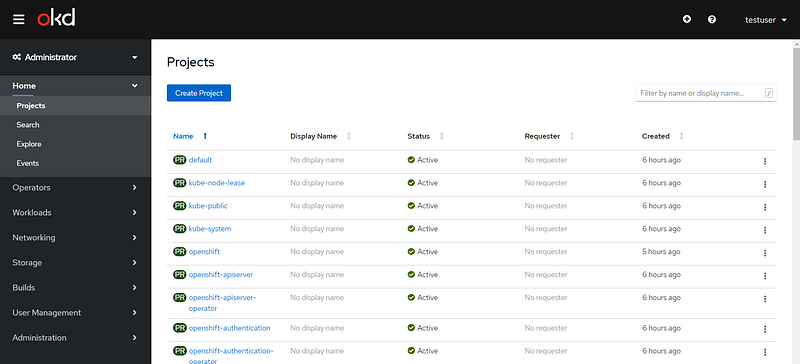
Bind the cluster-admin role to your user:
oc adm policy add-cluster-role-to-user cluster-admin <username>
Your user should now have cluster-admin level access:
To report issues, use the OKD Github Repo: https://github.com/openshift/okd
For support check out the #openshift-users channel on k8s Slack
The OKD Working Group meets bi-weekly to discuss the development and next steps. The meeting schedule and location are tracked in the openshift/community repo.
Google group for okd-wg: https://groups.google.com/forum/#!forum/okd-wg
This guide should get you up and started in the right direction. Good luck on your journey with OpenShift!